Category: Wordpress Tooltip Plugin Document

WordPress Tooltips Pro version 20.2.4 has been released, supporting a wide range of amazing member directory features

Hi dear WordPress tooltip users, I hope this message finds you well and that you’re enjoying a happy weekend with your family 🙂 We received an amazing support ticket from a WordPress Tooltip user. They mentioned that they purchased the WordPress Tooltips Pro plugin and would like to create a member directory for their school. After reading our WordPress Tooltips documentation, they discovered that the specific member directory functions they were looking for are only available in the WordPress Tooltips Pro Plus version. They asked if it would be possible to incorporate these fantastic member directory functionalities into the WordPress Tooltips Pro plugin as well. Absolutely! We are delighted to add the member directory functions requested by the WordPress Tooltip user into the WordPress Tooltips Pro plugin 🙂

What are the new member directory features that have been added to the WordPress Tooltips Pro plugin version 20.2.4?

Feature A: How to list specific type of users using fuzzy search in member directory of wordpress tooltip plugin?

1: WordPress Tooltip Pro Plus plugin customers can simply click on the “Download WordPress Tooltip” button to directly download the latest version. New users are kindly requested to purchase a license for WordPress Tooltip Pro Plus.

2: Once you have downloaded and installed WordPress Tooltip Pro+ plugin version 29.5.8 or higher, please proceed with the following steps.

3: For newcomers, we highly recommend watching our comprehensive video tutorial series titled “WordPress Tooltips Video Tutorial.” The third video in this series, titled “How to Upload and Activate WordPress Tooltips Pro Plugin,” provides detailed instructions.

4: Create a new WordPress post and insert the shortcode

[ member_directory search=’*class_president*’ ]

5: After completing the above steps, please check the member directory in the front-end. You will notice that it displays all class president in the member directory

Feature B: How do I display only users with specific user roles from a specified list of user IDs in the Member Directory?

1: Users of WordPress tooltip pro plus plugin please click download wordpress tooltip to download the new version directly, new user please purchase a license of wordpress tooltip pro plus

2: Downloaded and install wordpress tooltip pro + plugin which version >= 29.3.8

New users please check our detailed video tutorials at WordPress Tooltips Video Tutorial 3: How to upload and activate wordpress tooltips pro plugin

3: Crete a new wordpres post and insert the wordpress tooltip member directory shortcode :

[ member_directory role=’PTA’  include=’6,96,236,1151’ ]

4: Then please check member directory in front-end, you’ll find that the member directory will display  users who have the role “PTA”, and  user IDs  in (6,96,236,1151)

Feature C: How to only display users with a specific role in the member directory and hide users from the specified user ID list?

1: Customer of WordPress tooltip pro plus plugin please click download wordpress tooltip to download the new version directly, new user please purchase a license of wordpress tooltip pro plus

2: Downloaded and install wordpress tooltip pro + plugin which version >= 29.1.8

New users please check our detailed video tutorials at WordPress Tooltips Video Tutorial 3: How to upload and activate wordpress tooltips pro plugin

3: Crete a new wordpres post and insert the wordpress tooltip member directory shortcode :

[ member_directory role=’teacher’  exclude=’1,581,68,41’ ]

4: Then please check member directory in front-end, you’ll find that the member directory will display all users have the role “teacher”, but exclude users with user IDs 1,581,68, and 41

Feature D: How to disable specified users from appearing in the member directory?

1: Customer of WordPress tooltip pro plus plugin please click download wordpress tooltip to download the new version directly, new user please purchase a license of wordpress tooltip pro plus

2: Downloaded and install wordpress tooltip pro + plugin which version >= 29.0.8

New users please check our detailed video tutorials at WordPress Tooltips Video Tutorial 3: How to upload and activate wordpress tooltips pro plugin

3: Crete a new wordpres post and insert the wordpress tooltip member directory shortcode :

[ member_directory  exclude=’1,581,68,41’ ]

4: Then please check member directory in front-end, you’ll find that the member directory will display all users, but exclude users with user IDs 1,581,68, and 41

Feature E:How to bulk remove user from member directory in wordpress tooltip plugin

1: login wordpress tooltip site download wordpress tooltips pro plus 21.9.8 or tooltips pro 16.8.6.

2: upload ans activate wordpress tooltip plugin in your wordpress site

3: click tooltips menu in wordpress admin area and click directory settings panel, it looks like this:

directory settings panel in wordpress tooltips pro plus 19.2.8

directory settings panel in wordpress tooltips pro plus 19.2.8

This is directory panel in wordpress tooltip pro plus version 19.2.8, some features is not existed in tooltips pro version and more features is not included in wordpress tooltip free plugin, but member directory addon have same functions.

In the new version wordpress tooltips pro 20.9.8. you will find there are a new option “Bulk remove user from member directory by user id in wordpress tooltip”, it looks like this:

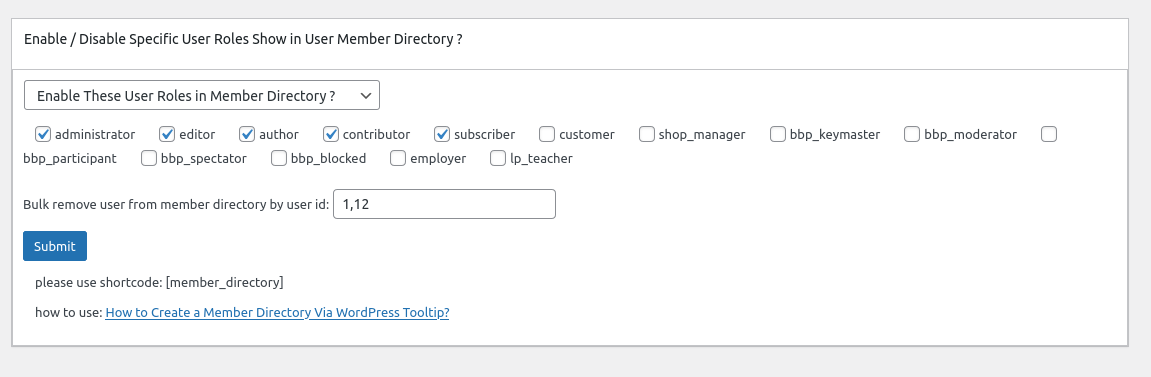
In here you can bulk enter user ids to exclude specific users from wordpress member directory in one time.

4: In front end, users which added in the “Bulk remove user from member directory by user id in wordpress tooltip” option, will be removed from wordpress member directory


If you have any more feature request or question for wordpress tooltip plugin, please don’t hesitate to contact us, we are happy to improve wordpress tooltip for you always, and we will give you a few license of our amazing wordpress plugins too


Tagged with: , , ,

I just saw that it displays a wordpress tooltip on the logo? How to remove it?

Hello there, wonderful WordPress Tooltip plugin users! I sincerely hope this message reaches you in the best of spirits, bringing you joy and warmth in the company of your loved ones. Our team recently received a support ticket from a delightful new user of our esteemed WordPress Tooltip plugin. In their message, this user shared the following:

Hello, I bought and installed the plugin, I added a “tooltip” I  can see the highlighted word, but no window is displayed on the word.  Can you help me?

Our wordpress tooltip plugin support replied:

Hello, I trust this message finds you in excellent spirits, enjoying blissful days with your cherished family. Thank you ever so much for reaching out to us. We are absolutely thrilled to assist you in resolving this matter. In general, the issue you’re facing may be caused by a cache plugin that compresses the JavaScript code of various plugins. Here are a couple of troubleshooting steps you can try:

  1. Within the WordPress Tooltip backend, navigate to the global settings. Locate the option labeled “Load Tooltip JavaScript in WordPress Header or WordPress Footer”. Please experiment with loading the WordPress Tooltip JS codes in the footer. If that doesn’t yield the desired result, you can try loading the JS code in the header.
  2. Additionally, you have the option to enable jQuery-migrate in the WordPress Tooltip plugin’s global settings panel.
  3. If the above steps haven’t resolved the issue yet, it’s possible that another plugin is using a similar tooltip code to ours, but it may not be adhering to the WordPress the_content API for returning the content of your post. Could you kindly provide us with the URL where the problem persists? I will promptly assign one of our skilled developers to investigate and rectify the issue for you. Once again, we extend our sincere gratitude for reaching out to us. Wishing you a day filled with blessings and joy in the presence of your loved ones. Warmest regards, Support Team WordPress Tooltip plugin

The wordpress tooltip plugin user told us he solved the problem:

Thank you indeed it was a cash problem.

On the other hand, I just saw that it displays a tooltip on the logo?
How to remove it?

Best

Our wordpress tooltip plugin support replied:

Hi,

Thanks for the message 🙂

It is great to heard you have solved the first issue 🙂

About tooltips on the logo, would you please try:

1: in wordpress tooltip global settings panel, navigate to “enable tooltips for image” option, then select “I want to disable tooltips for image”

If you want to enable tooltips for image yet, then you can try:
2: locate “tooltips for image setting” option, select “use rel attribute in img tag as content of tooltips for image”

Hope this have a little help 🙂

Thanks, have a blessed day with your family 🙂

Best Regards,
Wordpress Tooltips Plugin Support

The client informed us that all issues have been resolved. We believe that there may be other WordPress Tooltip users with similar questions, so we have shared this support ticket and its solution here. We hope this provides some assistance.

Thanks, have a blessed day with your family

Best Regards,
Wordpress Tooltips Plugin Support Team


Tagged with: , , , ,

How to install the latest update of WordPress Tooltip PRO?

Hello, dear users of the WordPress Tooltip plugin, I hope this message finds you are doing well and that you are enjoying happy days with your family 🙂  We have received a ticket from user of the WordPress Tooltip plugin who asked us how to upgrade to the new version of wordpress tooltips pro plugin, we believe there are more users with a similar question about upgrade the tooltips pro plugin to the latest version. Therefore,  we are happy to provide a detailed, step-by-step instructions  on how to install the latest update of wordpress Tooltip PRO 🙂

The user of wordpress tooltips plugin asked:

Update to latest version of PRO

I have used Tooltip PRO and Footnote for years now, how I can automatically update to latest version.  Can I just do an install of the latest .zip plugin archive and expect the existing installation to be upgraded to the latest version. I Have 15.8.0 right now?

Please give instructions (step-by-step) on how to install the latest update of Tooltip PRO as well as Footnote. Can I just download the latest version and install that with the zip pacakage installer built-in to WordPress and will that automatically replace the older version without destroying my entire database of
tooltips that is truly extensive. I don’t have good experience backing up WordPress, so I want a solition that simply works when upgrading.

What will happen if I uninstall my present version 15.8 and install the newest version of Tooltips PRO. Will my LOOONG list of tooltips automatically re-appear? The other thing is I also have bought the supplemental “Footnote” plugin and will that be changed?Do I have to delete the existing installation of Tooltips PRO 15.8 before installing the new version.

The two licenses mentioned on my invoice are:
1) Tooltip Pro Plugin Single Site License One Time Payment Unlimited
Upgrade
and
2) WordPress Footnote Plugin

Please tell me the easiest way to do this step by step as your instructions are not very clear – to say the least.

Our wordpress tooltips plugin support replied:

Hi,

Hope you are doing well and having happy days with your family 🙂

Thanks for the message 🙂

We are very happy to help you 🙂

Sir, when you upgrade to the new version of tooltips pro plugin, tooltips pro will not destroy “database of tooltips”, it is safe to upgrade to latest version of tooltips plugin always 🙂

How to Upgrade to the Newest WordPress Tooltips Pro?

It is always safe to update from old version to another new version, our wordpress tooltip pro plugin will detect your version and upgrade it safely, you can do it by this way:

#1 Download the latest wordpress tooltips version, if you do not know how to download tooltips plugin, please check:

How To Download WordPress Tooltips Pro Plugin? — https://tooltips.org/how-to-download-wordpress-tooltips-pro-plugin/

#2 Optional: Install wordpress backup plugin “Duplicator” or all in one migrate, and do a full backup for your site, it just need about 3 minutes, by this way, your site will in zero risk always

This is not only useful when upgrading the tooltip plugin, but also when upgrading other plugins, it will protect your data and website!

#3 Then go to wordpress plugins panel, deactivate tooltips free or old tooltips pro plugin

#4 Click Delete button to delete tooltips free or old tooltips pro plugin

#5 Upload new tooltips pro zip file in plugins panel

#6 Activate latest version of tooltips pro plugin

Hope this have a little help 🙂

Thanks, have a blessed day with your family 🙂

Best Regards,
Wordpress Tooltips Plugin Support Team


Tagged with: , ,

How to link or associate wordpress tooltip to a given element?

WordPress Tooltip plugin Users, hope this message finds you are doing well and having a happy day with your family  🙂 We received a support ticket from a wordpress tooltip plugin user, in which the tooltip user said:

Apologies, newbie here. I still can’t figure out how to link or associate a tooltip to a given element. So I’ve created a tooltip and say I want this to appear when the user hovers over a button element (With the label”Add person” and id=”add-person”) on my page. How do I go about this? That is, how do I associate the tooltip I just created with this button element?

We hold the belief that a greater number of users might possess a comparable inquiry. Hence, we intend to openly distribute our answer to all users of WordPress Tooltip. 🙂

What is the purpose of tooltips?

Tooltips are compact popup boxes that provide additional information such as videos, audios, images, Google Maps, QR codes, Wikipedia articles, and text. When users hover over an element on your web pages, such as a word in a post, a search form input box, an image, or a sidebar widget, tooltips seamlessly appear to offer engaging details. The WordPress Tooltip plugin grants the capability to apply tooltip effects to any element within WordPress posts, menus, comments, contact forms, WooCommerce products, bbPress forums, BuddyPress activities, and more. This plugin boasts an array of captivating components and addons, including the delightful Bullets Screen feature. 🙂

Introducing the WordPress Tooltip Plugin

WordPress Tooltip Pro is a plugin specifically designed to enhance your WordPress website with visually appealing and versatile tooltips. It allows you to create captivating tooltip styles that beautifully present content to your users, all while optimizing screen space.

When a user hovers over an item, a vibrant and animated tooltip popup box is displayed. You have the flexibility to incorporate various forms of content including videos, audios, images, and even third-party generated content from plugins like QR codes, Amazon ads, and Google Maps. All of this can be effortlessly added via the standard WordPress editor, making it incredibly user-friendly.


As a novice, learn the process of creating your initial tooltips using the WordPress Tooltips Pro Plugin

  • WordPress Tooltip facilitates the effortless creation of tooltips. We will guide you through the process of adding tooltips step by step.
  • Log in to your account on the WordPress Tooltip Plugin website.
  • If you haven’t installed the WordPress Tooltip Plugin yet, please log in to your account on the WordPress Glossary Tooltip Plugin website. If you have already installed the WordPress Tooltip Plugin, you can directly proceed to step #10.
  • Look for the “Download” link on the top menu bar or simply click this link: [link to WordPress Glossary Tooltip Plugin] to download the WordPress Tooltips Pro Plugin.
  • Access the admin area of your WordPress site and log in.
  • Navigate to the “Plugins” menu item.
  • Deactivate the previous version of the tooltips plugin.
  • Delete the old WordPress Tooltip Plugin.
  • In the “Plugins” menu item, click on “Add New” at the top of the plugins panel.
  • Upload the zip file of the tooltips plugin that you downloaded from the WordPress Glossary Plugin website.
  • Activate the latest version of the WordPress Tooltip Pro Plugin.
  • Navigate to the WordPress admin sidebar. Click on “Tooltips” and then “Add New” to initiate the addition of a new WordPress tooltip.
    add new wordpress tooltip
  • Within the WordPress post text editor, you have the freedom to incorporate various HTML elements into the tooltip. These elements may include images, links, and text.Add new wordpress toolip
  • Congratulations! You have now successfully included a WordPress tooltip. When you hover over the designated keyword, the tooltip will be triggered. Additionally, our WordPress tooltip plugin offers a multitude of customization options to enhance the appearance of your tooltips. These options encompass parameters such as text color, background, font size, width, shadow, opacity, trigger method, and more.
  • Video tutorial:

How to link or associate wordpress tooltip to a given element?

1. Please create a new wordpress tooltip term, in wordpress dashboard, you can click on the “Add New” submenu item to open the Tooltips Creator. The interface will resemble the tooltips editor shown below:


tooltips editor

tooltips editor

2. In the above diagram, you’ll notice a metabox labeled “Tooltips for Forms.” However, it should actually be titled “Tooltips for Classes.” We made this change because we observed that the most common use cases involved adding tooltips to form elements or fields using CSS classes or IDs. This alteration is intended to help users understand the metabox purpose as tooltips for forms.

3. Simply enter the CSS class or CSS ID in the “Tooltip for Forms” input box where you want to apply the tooltip effect:

For example, tooltips for class:
.input_box_1
or tooltips for ID:
#text_box_2

If you’re unsure how to find the CSS Class or CSS ID for a specific component in WordPress, please refer to the guide titled “How to Find a CSS Class or CSS ID of a Component in WordPress Page?

4. Make sure you’ve entered the tooltip title and content in the tooltips editor, then click the “Publish” button.

5. On the frontend, when you visit a page that contains the specified CSS class or CSS ID, hovering over the class element will trigger the display of the tooltip content in a tooltip window.

6. Here to check  tooltips for class DEMO , you can see a demonstration of wordpress tooltips for classes. In the form, as you hover over each field, a dedicated tooltip window will appear. This way, you can add tooltips for various CSS classes or IDs on the frontend. For instance, you can have tooltips for contact forms, images, videos, buttons, menu items, maps, text, and more.

7. Please note that within the tooltip editor, you can customize unique and visually appealing tooltip styles for each tooltip term. Additionally, you can apply different animations for individual tooltips.


Conclusion:

WordPress tooltips user can add tooltips to specific elements within their WordPress website, such as form fields, form labels, menu items, button, or any other interactive elements. By linking or associating tooltips to these elements, they can provide additional information, instructions, or clarifications to users when interacting with these elements. For example:

  • In a form field, a tooltip can provide guidance on the expected format or provide a brief description of the input required.
  • In a form label, a tooltip can provide further explanation or examples for the label’s purpose.
  • In a menu item, a tooltip can offer a brief description or indicate the functionality of the item when hovered over. The user’s feature request aims to improve the user experience by reducing ambiguity, providing helpful hints, or giving users more information about specific elements. This can lead to better usability and understanding of the website’s features or input requirements.
  • …etc

The feature of “Tooltips for anything” — can improve the user experience by reducing ambiguity, providing helpful hints, or giving users more information about specific elements. This can lead to better usability and understanding of the website’s features or input requirements.


Tagged with: , , , ,

How can I change the colour of a glossary term in wordpress tooltip plugin?

Hey there, awesome WordPress Tooltips Plugin users! Hope this message finds you all kickin’ it and enjoying some awesome family time! We recently had a query from a fresh face using the WordPress tooltips plugin. They had a question that goes a little something like this:
“Hey, WordPress tooltips are great! Quick question: Can we jazz up the color of a glossary term?”
Absolutely! The WordPress Tooltips Pro plugin has got your back when it comes to customizing the color of your glossary terms. We know many of you must be wondering about this too, so we thought why not put together a super detailed document that you can all access and dive into? Consider it our little gift to the WordPress tooltips plugin community 🙂

How can I change the colour of a glossary term in wordpress tooltip plugin?

  • First things first, log into your WordPress tooltip glossary plugin account like a boss.
  • Head on over to your account and download the WordPress Glossary Tooltip Plugin. It’s all waiting for you there.
  • Time to put on your WordPress admin hat and log in like a pro.
  • Once you’re in, locate the “Plugins” menu item in the WordPress admin dashboard.
  • Show the old version of WordPress tooltips plugin who’s boss by deactivating it.
  • With the old plugin taken care of, it’s time to delete it completely. No room for outdated stuff here.
  • Get back to the “Plugins” menu item and flex your skills by clicking “Add New” at the top of the plugins panel.
  • Upload the zip file of the tooltips plugin that you grabbed from the WordPress Glossary Tooltip Plugin site. Show it who’s the boss now!
  • Activate the latest and greatest version of the WordPress Glossary Tooltip Plugin. It’s ready to bring some serious style to your glossary.
  • Time to dive into the “Tooltips” menu item like a pro.
  • Look for the “Glossary Settings” sub-menu item and give it a click. Boom! You just entered the “Glossary Settings” panel.

    glossary settings in tt plus 30.4.8

    glossary settings in tt plus 30.4.8

  • Prepare to be blown away because there’s a shiny new option waiting for you at the bottom of the “Glossary Term Font Color” panel. It’s aptly named “Glossary Term Font Color.” Use the WordPress color picker to select the color of your dreams for those glossary terms. Picture it, a palette of possibilities!
  • Once you’ve nailed the perfect color, don’t forget to hit that “Save Changes” blue button. It’s like sealing the deal on your glossary’s style.
  • Take a victory lap and head to the front end. Open up your glossary index page and prepare to be blown away—you’ll see your glossary terms rocking the new font color you’ve just set. Stand back and admire your work! There you have it, my friend! Your WordPress Glossary Tooltip Plugin is all set to showcase glossary terms in a font color that’s as hip as the streets of NYC. Enjoy the stylish journey!

Conclusion:

It is very easy to customize glosary color in wordpress tooltip, just one click 🙂 WordPress tooltip users may want to customize the glossary term font color in the WordPress Glossary Tooltip Plugin for a variety of reasons:

Branding: Users may want to match the glossary terms’ font color with their website’s overall branding and design. By customizing the font color, they can create a cohesive and visually appealing user experience.

Visual Hierarchy: Highlighting glossary terms with a different font color helps to distinguish and draw attention to these specific terms. It can make it easier for users to identify and understand them within the content.

Aesthetic Appeal: Customizing the font color allows users to add a touch of personalization and enhance the visual aesthetics of their website. It gives them the opportunity to infuse their own style and creativity into the glossary presentation.

Accessibility: By customizing the font color, users can ensure that the glossary terms are easily readable and accessible to all users, including those with visual impairments. They can choose a color that provides sufficient contrast with the background for better readability.

Consistency: Some users may want to maintain consistency throughout their website by using specific color schemes. Customizing the glossary term font color allows them to align the glossary with the overall visual style of their website.
Overall, the ability to customize the glossary term font color in the WordPress Glossary Tooltip Plugin provides users with flexibility and control over the visual appearance of their glossary, allowing them to tailor it to their unique preferences and requirements.


Tagged with: ,

how to suspend the wordpress tooltip for a wordpress page?

Dear WordPress Tooltip Users, We hope this message finds you well and that you are having a happy weekend with your family We have received a support ticket from a user of the WordPress Tooltip plugin who needs assistance with disabling tooltips in a WordPress Tooltip post, he said:

Hello, I bought Tooltips Pro. How can I activate this in my WordPress? The free version is currently installed. My next question is, how to suspend the tooltip for a page? My tooltips are terms that have their own article. This means that the tooltip should not be displayed on the connected post page.

Our support team for the WordPress Tooltip plugin has responded:

Hi,

Hope you are doing well and having wonderful days with your family 🙂

Thanks for the message 🙂

We are very happy to help you 🙂

About how to activate tooltip pro version, would you please check:

WordPress Tooltips Video Tutorial 2: Deactivate tooltips free plugin

WordPress Tooltips Video Tutorial 3: How to upload and activate wordpress tooltips pro plugin

I am assign our wordpress tooltip developer to check another question for you, we will reply you again 🙂

Thanks, have a blessed day with your family 🙂

Best Regards,
Wordpress tooltips plugin support


Regarding the question on how to suspend the tooltip for a page, we believe that many other WordPress Tooltip users may have a similar inquiry. We would be delighted to create a dedicated document specifically for users of the WordPress Tooltip plugin

how to disable wordpress tooltip for a wordpress page?

We have a couple of methods to disable wordpress tooltips on a WordPress post.

1: Method 1 of disable tooltip for wordpress page:

When you add or edit a WordPress post or page using the standard editor, the URL typically appears as tooltips.org/wp-admin/post-new.php. In the right-hand section of the WordPress editor, you’ll find a “disable tooltip for this page” meta box.

By checking the “disable tooltips for the page” option within this meta box, tooltips will not be displayed automatically in that specific post. It will look something like this:

Disable specific tooltips

Disable specific tooltips

Disable specific tooltips Allow wordpress tooltip admin to provide a clearer explanation with an example. Let’s say you have a tooltip term called “WordPress” and its corresponding content is “We all love WordPress.” Normally, if your posts contain the word “WordPress,” our tooltips plugin will detect it and add tooltip effects like dotted lines or double lines.

When users hover over the word “WordPress,” a tooltip popup window will be displayed. However, if you disable tooltips for this page, even if your post includes the word “WordPress,” no tooltip effects will be added. Consequently, when users hover over the word “WordPress,” the tooltip content will not appear automatically.

Please note that while tooltips won’t function automatically on this specific page, you can still manually add tooltips using the tooltip shortcode “tooltips”.

2: Method 2 of disable tooltip for wordpress page:

In the WordPress Tooltips Pro plugin version, you have enhanced functionality compared to the free WordPress Tooltips plugin. With this pro version, you can take advantage of various options to customize the behavior of tooltips. These options include disabling tooltips for specific elements like headings (h1, h2, h3), links, and other HTML tags. Additionally, you can choose to enable or disable tooltips for post excerpts, images, category titles, and even control tooltips on mobile devices or throughout the entire site. While the free version of WordPress Tooltips doesn’t offer the same level of customization, the pro version provides a solution —- Within the Tooltips Optional Settings panel, you’ll find the “Disable tooltips for selected classes and IDs” option:

disable wordpress tooltip for selected css classed and ids and html tags


Through this feature, you can specify CSS classes, IDs (separated by commas), and even HTML tags. By entering these selections, the tooltips associated with the chosen classes and IDs will be removed on the front end of your website. Suppose you want to disable tooltips for the 15th tooltip term in your WordPress post while keeping tooltips enabled for other similar instances. To achieve this, you can simply edit your post and add a span class around the 15th tooltip term with a descriptive keyword. For example, you can include <span class="wanttoremovetooltipeffect">your keyword</span>. Then, enter the corresponding class (.wanttoremovetooltipeffect) in the “Disable tooltips for selected classes and IDs” option. As a result, all tooltip terms wrapped in the specified span class will no longer display tooltip effects on the front end.

Furthermore, you can extend this functionality by using additional HTML tags like div, p, h5, h1, and others, to achieve the same effect. Suppose your tooltip terms are located within a section generated by a third-party WordPress plugin. In that case, you can easily identify the div class or ID associated with that section. Here’s how you can do it: open your WordPress page in a browser, press F12 to access the browser inspector, and hover your mouse over the section generated by the plugin. Within the inspector, you’ll find the div ID or div class, which you can copy and enter into the “Disable tooltips for selected classes and IDs” option. As a result, all WordPress tooltip terms within that particular section will have their tooltip effects removed on the front end of your site.

3: Method 3 of disable tooltip for wordpress page:

The WordPress Tooltip Plugin offers a convenient feature that allows you to disable tooltips in multiple WordPress posts using their respective IDs. Here’s a step-by-step guide on how to bulk disable tooltips using post IDs:

  1. Begin by logging into your WordPress admin area.
  2. Navigate to the “Tooltips” menu item.
  3. Click on the “Tooltips Optional Settings” sub-menu item. This can be found within the Tooltip plugin menu, resembling the following: WordPress Tooltips Menu Item
  4. You will be directed to the “Tooltips Optional Settings” panel, where you’ll find the “Bulk disable tooltips in post by post ID” option box:Bulk disable tooltips in post by post id displayed as: Bulk disable tooltips in post by post ID In this input box, you can simply enter the post IDs you wish to disable tooltips for. To specify multiple IDs, separate them with commas. For instance, you can input the following format: 3,22,58,126,583. Once you save these settings, the WordPress Tooltip Plugin will cease adding tooltip effects to those specified posts on the front end. Kindly note that this option is not applicable to tooltips generated through the “tooltips” shortcode.

Conclusion:

In wordpress tooltips pro plugin, we have a couple of methods to disable wordpress tooltips on a WordPress post. There could be several reasons why a WordPress author might want to disable WordPress tooltip effects in a post:

  1. Content preference: The author may have a specific writing style or content structure that doesn’t align with the use of tooltips. Disabling tooltips allows them to present the information without any additional pop-up elements.
  2. Design consistency: The author might have a particular design concept for their website, and tooltips might not fit the overall aesthetic or flow of the content. They may choose to disable tooltips to maintain a consistent visual experience throughout their posts.
  3. User experience: The author may believe that tooltips could potentially disrupt the user experience or distract readers from the main content. By disabling tooltips, the author ensures that readers can focus solely on the core information being presented.
  4. Accessibility concerns: Tooltips may not be accessible to all users, especially those who rely on assistive technologies or have visual impairments. Disabling tooltips ensures that all users can access the information without any barriers.
  5. Avoiding information overload: In some cases, the author may have a significant amount of content or a dense topic, and they may choose to disable tooltips to prevent overwhelming readers with an excessive amount of tooltip information. Ultimately, the decision to disable WordPress tooltip effects in a post depends on the author’s specific needs, preferences, and goals for the content they are creating.
Tagged with: , ,

How do I correctly use the icon wordpress tooltip shortcode?

WordPress Tooltip plugin Users, hope this message finds you are doing well and having a happy day with your family   We have received a ticket from a new user of the WordPress Tooltip plugin, and we believe that more users may have a similar question. Therefore, we would like to share our records with all WordPress Tooltip users publicly, the user told us:

Hi Guys,
I cant figure out how to simply add a tooltip to an icon, like you do on almost every screen of your plugin(for example, in the Glossary Settings page). I can add a tooltip that will globally underline a specific term (the title of the new tooltip) anywhere on the site and provide a definition, etc., but I’m more interested in providing one-off tooltips linked to a question mark or info icon. I’ve been looking all over and cant find anything to help me. I’m using the latest wordpress version and the DIVI theme. the icon i’m using is actually from an icon font called Elegant Themes Icon Font. any assistance you can provide would be much appreciated.
Thanks,

Our wordpress tooltip plugin support replied:

Hi,

I hope this message finds you well and that you are having wonderful days with your family 🙂

Thanks for the message, we are very happy to help you 🙂

We have several methods for creating wordpress icon tooltips. Could you please review our detailed documentation on:

How to build more than 1500 pretty icon logo tooltip via font awesome tooltip?

and

How to Build a SVG Tooltip?

and

How to use wordpress tooltip shortcode [tooltips]] to add tooltips manually?

Please check icon_tooltip_by_id section

Or maybe this one:

WordPress Tooltip Glossary Plugin 10.6.2 Released, Support Enclosing Shortcodes

Hope this have a little help 🙂

Thanks, have a blessed day with your family 🙂

Best Regards,
Wordpress Tooltips Support

The wordpress tooltip user replied:

Hello Support,

Thanks for the quick response, however I have already viewed these pages and I still cannot add a simple tooltip over say, an icon. The only thing I have been able to do is add a global tooltip for a word or phrase, one that underlines each occurrence and displays the same tooltip for each. But, I cannot figure out how to link a tooltip to an icon. I’m not sure what I’m missing.

Specifically I have two areas of concern:

1 – I may have a setup issue.

When I copied your shortcode example from your site, [[tooltips content = ‘you are very welcome!’]]:)[[/tooltips], and put in my site it does not display correctly. I get this:

The snippet of HTML looks like this:

help you with whatever problems or questions you have. [tooltips content = ‘you are very welcome!’]]:)[[/tooltips]

&nbsp;
<<< h2 class=”art2″>Our Customers</h2>>>

As you can see, only the first word displays and it includes the leading quotation mark. Might you have any idea why the full tooltip message is not being displayed correctly? I did customize the look in Tooltips Style, but if I revert to the default appearance I get the same result.

I’m running the latest version of WordPress and I am using the DIVI builder.

My second issue/question is:

2 – After I create new tooltip in Add New, how do I link that to an icon?

First of all, in the image below, do I need to add a title? And if I do won’t that link to each occurrence of that word or phrase on my site?

I’m not sure if this is the way to do it but I tried to use your tooltip icon_tooltip_by_id, specifically:
[icon_tooltip_by_id tooltip_id=‘24645’]];)[[/icon_tooltip_by_id]

Is it correct to use the ID number listed in the permalink below?  When I try this nothing shows up on my page.

The HTML on my page looks like this:

Service Providers with thousands of users, and everything in between.[icon_tooltip_by_id
tooltip_id=‘24645’]];)[[/icon_tooltip_by_id]

&nbsp;
<<< h2 class=”art2″><<<a name=”Inf”><<</a><<</h2>

The page displays like this:

Obviously I’m doing something wrong. Is the ID number not correct?  Do I need to do something specific regarding the type of icon I am using? Could you please point me in the right direction?

Thank you.

Our wordpress tooltip plugin support replied:

Hi,

Thanks for the reply 🙂

Sorry for the problems, we will help you solve all problems 🙂

1: about [tooltips content = ‘you are very welcome!’]]:)[[/tooltips], we copied the shortcode in our site and it works well, thanks for another reply :
———

I figured out my first issue (below) so no need to reply to that one. For this shortcode from your site [tooltips content = ‘you are very welcome!’]] it worked when I changed the single quote to a double quote. I was pulling my hair out trying to figure out why is wasn’t working. If that is indeed the correct fix you guys might want to modify your site example. It was on this page:

How to use wordpress tooltip shortcode [tooltips] to add tooltips manually?


———

In some cases, Gutenberg will replace the ‘ in shortocode to “ format automatically like this, we have a detailed document with screenshots at:

How to Insert Image Tooltip Shortcode Inline in Gutenberg?

If you check our document, you will know the reason and how to solve the problem 🙂

Sir, please note, in the shortcode [[tooltips content = ‘you are very welcome!’]], it seems you are not using ‘, you are using ‘ , wordpress just support ‘ and ” in shortcode, do not support ‘

the right shortcode should be:
[[tooltips content = 'you are very welcome!']]:)[[/tooltips]

About question 2 “Is it correct to use the ID number listed in the permalink below? When I try this nothing shows up on my page…”

Sir, the ID number is right, the problem is — you need input tooltip title for each tooltip, else it will not works. When you using icon tooltip shortcode, the function of shortcode will not display the tooltip title, but you need input tooltip title for each tooltip terms 🙂

Hope this have a little help 🙂

Thanks, have a blessed day with your family 🙂

Best Regards,
Wordpress Tooltips Plugin Support

The client informed us that the problem has been resolved correctly. 🙂

Conclusion:

A WordPress user expressed interest in adding tooltips effects to icons. They may require this feature for the following reasons:

  1. Enhancing User Experience: Tooltips can provide additional information or explanations when users hover over icons. This can improve the overall user experience by offering context and clarity.
  2. Increased Accessibility: Tooltips can be useful for users who may have difficulty understanding the meaning or purpose of certain icons. By providing tooltips, the user can access additional information to better comprehend the functionality.
  3. Guiding User Interaction: Tooltips can serve as a guidance tool for users, offering instructions or tips on how to interact with specific icons or elements on a website.
  4. Visual Design Enhancement: Implementing tooltips can also contribute to the visual appeal of a website. It adds an interactive element and can make the user interface more engaging and dynamic. Overall, the addition of tooltips to icons can improve usability, accessibility, and the overall visual experience of a website for its users.

WordPress tooltips plugin support add tooltips effect on icons, We have a few methods to make a icon tooltips, and we are very happy to add more functions based on your suggestion 🙂

Tagged with: , ,

How to Customize Tooltip Background Colors in the WordPress Tooltip Style Settings Panel?

Hi, dear users of WordPress Tooltip plugin, I sincerely hope this message finds you in the best of spirits and basking in the warmth of happiness alongside your cherished companions. 🙂 We received a support ticket from a new user of the WordPress Tooltip plugin. In the ticket, he mentioned:

Hi,

I just purchased tooltips pro license, I love the tooltips but I cannot edit background colors in the customizer, would you please be so kind to check and teach me how to get it work?

Thanks, take care

We believe that more new users may have similar questions, and we would like to publicly share the reply from our WordPress Tooltip support here to assist more users in using the WordPress Tooltip plugin quickly and easily:

Hi,

Hope this message find you are doing well and having happy weekend with your family

Thanks for the message, we are very happy to help you

Thanks for the URL, our wordpress tooltip developer checked it 🙂

We found you still using the default preset tooltip stylesheet,it is very easy to custom tooltip colors via a few clicks. If you’re using the WordPress Tooltips Pro Plus plugin, here’s a quick guide to help you make the most of it.

First, head over to tooltips.org and log in to your account. Once logged in, click on ‘WordPress Tooltip Download‘ to grab the latest version of the WordPress Tooltips Pro Plus plugin.

Now, let’s get your WordPress site in tip-top shape. Login as wordpress admin and head over to the ‘Plugins’ menu. Find the current version of the WordPress Tooltips plugin, and deactivate it. Don’t forget to delete it from the plugins panel too. Next up, it’s time to bring in the new kid on the block. Upload the shiny new version of the WordPress Tooltip plugin (in zip file format) in the plugins panel. Once uploaded, activate it.

If you’re new to the WordPress Tooltip plugin, we’ve got you covered with a helpful video tutorial on how to install it. Check out our ‘WordPress Tooltips Video Tutorial 3: How to upload and activate wordpress tooltips pro plugin‘ for step-by-step guidance.

Now, let’s add some style to your tooltips. Head to the WordPress dashboard and navigate to the tooltips menu. Click on ‘Tooltip Styles’ in the sub-menu, and voila! You’ll find yourself in the fabulous Tooltip Style Settings panel. It looks like this:

Tooltips Style Panel in wordpress tooltips pro plus 28.2.8

Please go to the panel “Tooltips Box Customize Setting”, you can customize colors in here, for example:

WordPress Tooltip Box Background (required field)

You can changer wordpress tootlip popup box background easily with wordpress tooltip color picker.

Wordpress Tooltip Box Background
and then please go ahead and unleash your creativity to customize your tooltips, making them truly shine. Feel free to explore the menu and make adjustments that suit your website’s aesthetic and needs. 🙂

We hope this guide helps you navigate through the wonderful world of WordPress Tooltips Pro Plus. If you have any further questions or need assistance, our friendly support team is just a message away.

Happy tooltip-ing!
The WordPress Tooltips Pro Plus Team

Tagged with: ,

How can I upgrade from WordPress Tooltips Pro to WordPress Tooltips Pro Plus?

Hi dear wordpress tooltips plugin users, I hope this message find you are doing well and having wonderful days with your loved ones 🙂 We have received a ticket from a new user of wordpress tooltip plugin, he asked: “Hello Team, I bought the plugin a couple of hours ago and I was wondering how to upgrade my plan from 1 website to unlimited websites?”, We believe that there are may be more users have similar questions, so we’d like to publicly  document to solution here:

How to upgrade from WordPress Tooltips Pro plugin to WordPress Tooltips Pro Plus plugin ?

To upgrade from WordPress Tooltips Pro to WordPress Tooltips Pro Plus, please follow these steps:

  1. Log in to your WordPress dashboard.
  2. Go to the “Plugins” section in the left-hand menu.
  3. Deactivate and delete the current WordPress Tooltips Pro plugin.
  4. Purchase the WordPress Tooltips Pro Plus version from the official website.
  5. Download the WordPress Tooltips Pro Plus plugin ZIP file to your computer.
  6. Back in the WordPress dashboard, navigate to the “Plugins” section and click on “Add New.”
  7. Click on the “Upload Plugin” button and choose the ZIP file you downloaded.
  8. Click on “Install Now” and wait for the plugin to upload and install.
  9. Once the installation is complete, click on “Activate Plugin” to activate WordPress Tooltips Pro Plus. Now you have successfully upgraded from WordPress Tooltips Pro to WordPress Tooltips Pro Plus.

Conclusion:

Many WordPress users often choose to use a WordPress tooltip plugin on their blog for several reasons:

  • Enhanced User Experience: By using wordpress tooltips plugin, website owners can provide additional information or explanations for specific terms, phrases, or elements on their site. This helps users understand the content better and improves overall user experience.
  • Visual Appeal: Tooltips add an interactive and visually appealing element to the website. They can be customized to match the site’s design and style, making the content more engaging and attractive to visitors.
  • Contextual Information: Tooltips allow website owners to provide contextual information without cluttering the main content. Users can access additional details or definitions by simply hovering over the tooltip-triggering elements, keeping the page clean and organized.
  • Call-to-Action Promotion: Some WordPress tooltip plugins offer the ability to include call-to-action buttons or links within tooltips. This feature enables website owners to direct users to specific pages, encourage actions, or generate leads.
  • Easy Implementation: WordPress tooltip plugins are usually easy to install and configure. Users can quickly add tooltips to their website, even without extensive technical knowledge or coding skills.
  • Customization Options: These plugins often provide various customization options, allowing users to choose tooltip styles, animations, behavior, and positioning that best fit their website design and requirements.
  • Compatibility: WordPress tooltips plugins are designed to work seamlessly with the WordPress platform, ensuring compatibility and smooth integration with other themes, plugins, and functionalities. Overall, using a WordPress tooltip plugin can enhance website usability, improve user engagement, and contribute to a more visually appealing and informative web experience.

If you want to upgrade from WordPress Tooltips Pro to WordPress Tooltips Pro Plus, please don’t hesitate to contact us, we are very happy to offer a discount for you 🙂


Tagged with: ,

How can I utilize a WordPress tooltip plugin to display tooltip effects on the logo of my WordPress site?

Hello dear users of WordPress Tooltip plugin, I , hope you are doing well and having happy days with your family A wordpress tooltip user wrote to us:

…So, I’ve got this pretty intricate and abstract logo on my WordPress site, right? And what I want is, when folks hover their mouse over it, bam! A little tooltip pops up, giving them the lowdown on what this logo’s all about. You know, just a quick explanation to clue them in on the meaning or symbolism behind it. Can your WordPress tooltip plugin handle something like that?…

Yes, it is indeed very easy to display a tooltip effect on the logo of a WordPress site using the WordPress tooltip plugin. 🙂

How can I utilize a WordPress tooltip plugin to display tooltip effects on the logo of my WordPress site?

  • Navigate to the “Tooltips” menu item in wordpress dashboard.
  • Click on the “Tooltips” menu item to proceed.
  • Next, select the “Global Settings” submenu item. This will open the “Tooltips Global Settings” panel, which resembles the screenshot below:

    Tooltips Global Settings in wordpress tooltips pro plus 27.5.8

    Tooltips Global Settings in wordpress tooltips pro plus 27.5.8

  • Within the panel, locate the section titled “Enable/Disable Tooltips for Image Setting”.
  • If you wish to enable wordpress tooltip functionality for images, ensure to choose the “I want to enable tooltips for image” option.
  • If you prefer not to display tooltips for images and icons on your WordPress site, simply select the “I want to disable tooltips for image” option.
  • Click the “Update Now” button in blue to save your settings. And that’s all there is to it! Your tooltip settings are now configured as desired.
  • When you hover your mouse over the site logo on the front-end of your WordPress site, a tooltip popup window displaying a description will appear.

Conclution:

Based on our experience, while it is less common to see wordpress tooltip effects specifically applied to site logos, there can be specific reasons why a WordPress user may want to do so. Here are a few possible explanations:

  1. Logo Description: The user may have a complex or abstract logo that requires additional explanation or context. By adding tooltip effects, they can provide a brief description of the logo’s meaning or symbolism to website visitors.
  2. Interactive Branding: The user may want to make their site logo more interactive and engaging. By using tooltips, they can create a dynamic element where visitors can hover over the logo to see additional information or messages related to their brand.
  3. Navigation or Functionality Aid: Tooltips on the site logo could be used as a way to provide quick navigation or functional cues. For example, hovering over the logo could display links to important sections of the website or provide access to certain features.
  4. Differentiate from Standard Practice: The user may simply want to stand out and have a unique design feature on their website. Applying tooltip effects to the site logo could be a way for them to differentiate their brand and make it more memorable. It’s important to note that the reasons for wanting tooltip effects on the site logo can vary greatly depending on the specific needs and preferences of the user. Therefore, it’s best to directly communicate with the user to understand their specific rationale behind this request.

In wordpress tooltips plugin, you can display wordpress tooltip effects on wordpress site logos via one click 🙂


Tagged with: , ,
Top