What is the process for creating multilingual content in a new tooltip using the Polylang plugin with wordpress tooltips? WordPress tooltips pro+ 31.5.8 released

Hello, dear users  WordPress Tooltip plugin , I hope this message finds you are doing well and having  happy days with your family   We got a wordpress tooltip users’ feedback, she said: “I am an e-commerce store owner, and I use your WordPress Tooltips Pro Plus plugin to provide detailed information about my products in my WooCommerce store. Your WordPress Tooltips plugin is excellently designed; it helps me hide information within tooltips, greatly simplifying the page design and avoiding information overload. At the same time, it addresses common user questions, reducing confusion and promoting shopping decisions. As a result, I have seen a significant increase in my product conversion rates. You have created a fantastic plugin!” And “I am currently expanding my business, and I need to provide multilingual functionality for my international customers to enhance user experience and boost sales. I have decided to use the Polylang plugin because I found that Polylang is a popular plugin for WordPress that allows users to create bilingual or multilingual websites with ease. However, when I wanted to edit the tooltips entries, I discovered that I couldn’t add German and French tooltip terms for my German and French users, how can I change tooltip language? Could you kindly help me resolve this issue?”

It is the first time we got this kind of feature request, our wordpress tooltips plugin developer installed wordpress polylang plugin, we found the plugin saying:

With Polylang fully integrated to WordPress and using only its built-in core features (taxonomies), keep steady performances on your site and create a multilingual site featuring from just one extra language to 10 or more depending on your needs. There is no limit in the number of languages added and WordPress’ language packs are automatically downloaded when ready.

After a few minutes, we realized we loved this wordpress multilingual plugin. Our WordPress tooltip plugin developer decided to support the Polylang plugin for woocommerce tooltip  users. We spent a few days reading the code of the Polylang plugin and discovered some technical issues with integrating Polylang into the WordPress tooltips plugin, primarily because WordPress tooltips are based on the WordPress custom post type standard. After several days of hard work, we finally found a method to support Polylang in the WordPress tooltip editor. It looks like this:

create multilingual tooltips in wordpress tooltips editor — long live peace

As you can see in the screenshot, you’ll see a “Language” section, in here you can select tooltip language on the right side of the wordpress tooltip editor, select the desired language for the post you are about to create (e.g., English, Spanish). Simply write your tooltip content (title, body, etc.) in the selected language. After saving the post, look for a section labeled “Languages” again on the right side. You should see a list of the languages you’ve configured. There will be options to add translations for your post. Then click on the “+” sign next to the language you want to translate the tooltip into (e.g., to add a Spanish translation). This will create a new tooltip editor for the selected language. Enter the translated title and content in the new editor. It’s important to make sure that the content accurately reflects the translation. Once you’re done entering the content for the translation, you can publish or update the post as needed. Make sure to do this for each language version you create.

After publishing, you can check the front end of your site to see the language switcher. This allows users to switch between the different language versions of your tooltips. 🙂

Tagged with: , , ,

Come sostituire il link “Glossario” nelle briciole di pane del glossario nel plugin WordPress Tooltips?

Ciao, cari utenti del plugin WordPress Tooltip, spero che questo messaggio vi trovi bene e che stiate trascorrendo un felice fine settimana con la vostra famiglia. Recentemente abbiamo rilasciato la versione 31.0.8 del plugin WordPress Tooltips Pro Plus in risposta ai feedback degli utenti. Un utente ha contattato inizialmente per ricevere aiuto con la configurazione della propria pagina del glossario, esprimendo difficoltà nel farla apparire come desiderato. Il nostro team di supporto li ha guidati con i passaggi per creare una nuova pagina e inserire uno shortcode. Dopo alcuni scambi, l’utente ha configurato con successo il proprio indice del glossario, ma desidera sostituire i link delle categorie del glossario nei breadcrumb con link a un’altra pagina SEO.

Per affrontare questo, il nostro team di supporto ha informato l’utente che stiamo lavorando a un aggiornamento per consentire la personalizzazione dei link dei breadcrumb. Di conseguenza, abbiamo sviluppato la nuova versione per implementare questa funzionalità richiesta dall’utente.

Questo rilascio mira a migliorare l’esperienza dell’utente e a risolvere le richieste specifiche fatte durante l’interazione di supporto. Grazie ai nostri utenti per il loro prezioso contributo!

Inoltre, il nostro sviluppatore del plugin WordPress Tooltip ha detto che è una grande idea supportare la personalizzazione del link del glossario nei breadcrumb, consentendo di portare a un’altra pagina. Così abbiamo sviluppato la versione 31.2.8 di WordPress Tooltips Pro Plus per dare vita a questa idea per gli utenti di WordPress Tooltip.

### Come sostituire il link “Glossario” nei breadcrumb del glossario nel plugin WordPress Tooltips?

Per utenti esistenti: Per scaricare l’ultima versione del plugin WordPress Tooltip Pro Plus, clicca sul link etichettato “scarica wordpress tooltip”. Assicurati che il numero della versione sia 31.0.8 o superiore. I nuovi utenti dovranno ottenere una licenza per il plugin WordPress Tooltip Pro Plus prima di procedere.
Accesso amministratore: Accedi al tuo sito WordPress con privilegi da amministratore.

Gestione plugin: Nel pannello di controllo del tuo sito, trova la sezione “Plugin”.

Rimuovi la vecchia versione: Disattiva ed elimina completamente eventuali versioni precedenti del plugin WordPress Tooltip dalla lista dei plugin.

Carica la nuova versione: Per installare il plugin aggiornato, clicca sul pulsante “Aggiungi Nuovo” e seleziona il file zip del nuovo plugin WordPress Tooltip.

Attiva il plugin: Dopo aver caricato, assicurati di attivare il plugin dal pannello dei plugin per accedere alle sue funzionalità.

Per utenti alla prima esperienza: Sei nuovo nel plugin WordPress Tooltip? Dai un’occhiata al nostro video tutorial sull’installazione: WordPress Tooltips Video Tutorial 3: Come caricare e attivare il plugin WordPress Tooltips Pro.

Accedi alle impostazioni: Nel tuo dashboard WordPress, vai al menu “Tooltips” e clicca sull’opzione “Impostazioni Glossario”. Il menu dovrebbe apparire come segue:

  • tooltips menu in wordpress tooltips pro plus 27.5.8

tooltips menu in wordpress tooltips pro plus 27.5.8

Personalizza i link dei breadcrumb: All’interno del pannello delle impostazioni del glossario, cerca l’opzione etichettata “Personalizza il link del glossario nei breadcrumb del glossario.” Ecco come appare:


Alla fine del pannello delle impostazioni, troverai un menu a discesa dove puoi scegliere tra varie pagine di WordPress. Seleziona semplicemente un’altra pagina per sostituire il link della categoria del glossario esistente nei breadcrumb.

Nota importante: Se preferisci non cambiare il link del glossario nei breadcrumb, scegli semplicemente “Nessuno” dal menu a discesa.

Nell’area delle impostazioni del glossario di WordPress, troverai l’opzione “Personalizza il link del glossario nei breadcrumb del glossario”, e appare così:

Come puoi vedere in fondo al pannello delle impostazioni del Glossario di WordPress, abbiamo aggiunto una nuova opzione chiamata ‘Personalizza il link del glossario nei breadcrumb del glossario’. In questa opzione, c’è una casella a discesa con l’elenco di tutte le pagine di WordPress. Puoi semplicemente selezionare un’altra pagina da questo menu a discesa per sostituire il link della categoria del glossario nei breadcrumb.
Ti preghiamo di notare:
Se non vuoi sostituire il link del glossario nei breadcrumb del glossario, seleziona semplicemente l’opzione “Nessuno” nella casella a discesa.
Apprezziamo davvero il tuo fantastico suggerimento! Se hai ulteriori idee per funzionalità, non esitare a contattarci. Siamo entusiasti di assisterti nel realizzare la tua visione!
Ti auguriamo una giornata meravigliosa, piena di gioia insieme ai tuoi cari!
Cordiali saluti,
Il team di supporto del plugin WordPress Tooltip

Tagged with: , , ,

Wie man Groß- oder Kleinschreibung in der spezifischen Glossartitel-Spalte im WordPress Tooltip Plugin anzeigen kann, unterstützt von WordPress Tooltips Pro Plus 30.9.

Liebe WordPress Tooltip Plugin-Benutzer,

ich hoffe, diese Nachricht findet Sie gut und Sie haben einen schönen Tag mit Ihrer Familie
Wir haben ein Support-Ticket von einem Benutzer des WordPress Tooltip Plugins erhalten, der um die Option zur Anzeige von Groß- oder Kleinschreibung in der spezifischen WordPress-Glossartitel-Spalte gebeten hat. Er sagte:

Hallo,
Ich schätze das von Ihnen entwickelte WordPress Tooltip Plugin sehr und habe beim Verwenden eine kleine Problem festgestellt. Nachdem ich einen Glossarbegriff eingegeben habe, wird dieser automatisch in der Glossartitelspalte auf der Website in Großbuchstaben umgewandelt. Ich würde jedoch gerne die Option haben, ob der Glossarbegriff in Großbuchstaben oder Kleinbuchstaben in der Titelspalte angezeigt werden soll, um meinen Anforderungen besser gerecht zu werden.
Ich persönlich glaube, dass eine solche Wahl den Benutzern mehr Flexibilität bieten würde. Wenn möglich, würde ich es sehr begrüßen, wenn Sie diese Option in einem zukünftigen Update hinzufügen könnten, um den Benutzern die freie Wahl zu lassen, ob der Glossarbegriff als Titel in Groß- oder Kleinbuchstaben angezeigt werden soll.
Vielen Dank für die Entwicklung dieses Plugins und danke, dass Sie sich die Zeit nehmen, meinen Vorschlag zu lesen und in Betracht zu ziehen. Ich freue mich auf Ihre Antwort und zukünftige Updates.
Beste Grüße,

Unser Support-Team für das WordPress Tooltip Plugin hat geantwortet:

Hallo,
ich hoffe, es geht Ihnen gut und Sie haben glückliche Tage mit Ihrer Familie
Vielen Dank für Ihre Nachricht
Wir helfen Ihnen sehr gerne weiter
Unser Entwickler hat Ihre Funktionsanfrage überprüft und ja, wir werden eine neue Version entwickeln, um Ihre Funktionsanfrage so schnell wie möglich umzusetzen. Wir werden Ihnen erneut antworten
Vielen Dank und haben Sie einen gesegneten Tag mit Ihrer Familie
Beste Grüße,
WordPress Tooltips Support Team

Dann hat unser Entwickler des WordPress-Tooltips-Plugins eine neue Version namens WordPress Tooltips Pro Plus 30.9.8 fertiggestellt, um die Funktionsanfrage des großartigen Benutzers so schnell wie möglich umzusetzen

Wie man Groß- oder Kleinschreibung in der spezifischen Glossarbegriff-Titel-Spalte im WordPress Tooltip Plugin anzeigt:

  1. Als Kunde des WordPress Tooltip Pro Plus Plugins klicken Sie bitte auf “Download WordPress Tooltip”, um die neue Version des WordPress Tooltip Pro+ Plugins herunterzuladen, die Version >= 30.9.8 ist. Neue Benutzer sollten bitte eine Lizenz für WordPress Tooltip Pro Plus erwerben.
  2. Melden Sie sich in Ihrem WordPress-Website als Administrator an und klicken Sie auf das Menü “Plugins”. Deaktivieren und löschen Sie dann die aktuelle Version des WordPress Tooltip Plugins im Plugin-Bereich. Laden Sie anschließend die neue Version des WordPress Tooltip Plugins (ZIP-Datei) hoch und aktivieren Sie es im Plugin-Bereich.
  3. Wenn Sie ein neuer Benutzer des WordPress Tooltip Plugins sind, schauen Sie sich bitte unser Video zur Installation des WordPress Tooltip an: WordPress Tooltips Video-Tutorial 3: So laden Sie das WordPress Tooltips Pro Plugin hoch und aktivieren es.
  4. Im WordPress-Dashboard navigieren Sie zum “Tooltips” -Menüpunkt und wählen dann den Untermenüpunkt “Glossary settings” aus. Das WordPress Tooltip Menü sieht wie folgt aus: Tooltips-Menü in WordPress Tooltips Pro Plus 27.5.8
  5. In den WordPress-Glossareinstellungen finden Sie die Option “Glossary Term Capitalization”. Hier können Sie “Großbuchstabenanzeige für Glossarbegriffe in der Titelspalte des Glossars” oder “Kleinbuchstabenanzeige für Glossarbegriffe in der Titelspalte des Glossars” auswählen, um Groß- oder Kleinschreibung in der angegebenen Glossarbegriff-Titelspalte im WordPress Tooltip Plugin anzuzeigen.

Vielen Dank für die großartige Funktionsanfrage. Wenn Sie weitere Fragen haben, zögern Sie bitte nicht, uns zu kontaktieren. Wir helfen Ihnen gerne weiter

Vielen Dank und haben Sie einen gesegneten Tag mit Ihrer Familie.

Beste Grüße,

Das Support-Team des WordPress Tooltips Plugins

Tagged with: , , , ,

How to update wordpress tooltips pro plugin?

Hi dear wordpress tooltips plugin users, I hope this message find you are doing well and having wonderful days with your family 🙂 We got an Italian wordpress tooltips user’s ticket, in which he asked:

Aggiornamento Plugin Pro

Come aggiornare il plugin della version pro?

We understand what the user asking is: How to update wordpress tooltips pro plugin?

Our wordpress tooltip plugin support reported:

Hi,

Hope you are doing well and having happy days with your family 🙂

Thanks for the message 🙂

We are very happy to help you 🙂

How to update wordpress tooltips pro plugin?

1:  if you are using wordpress tooltips free plugin, then you can upgrade to wordpress tooltips pro plus plugin via: https://tooltips.org/product/tooltips-pro-mutil-site-license/  or upgrade to wordpress tooltips pro  plugin via: https://tooltips.org/product/tooltips-pro-single-site/

2: then you can download wordpress tooltips pro plugin via download panel — https://tooltips.org/my-account/downloads/ , please check our video tutorial: WordPress Tooltips Video Tutorial 1: Download wordpress tooltips pro plugin

3: then please deactivate and delete wordpress tooltips free plugin in wordpress plugin panel, please check our video tutorial: WordPress Tooltips Video Tutorial 2: Deactivate tooltips free plugin

4: then you can upload and activate wordpress tooltips pro plugin to your wordpress site, please check our video tutorial at:WordPress Tooltips Video Tutorial 3: How to upload and activate wordpress tooltips pro plugin

5: if you are using wordpress tooltips pro plugin, when new version be released, you will get new version update notification bar at the top of the wordpress admin area

6: please deactivate current wordpress tooltips pro plugin and delete it in wordpress plugin panel

7: then you can login tooltips.org and download tooltips pro plugin, please check our detailed video tutorial at: WordPress Tooltips Video Tutorial 1: Download wordpress tooltips pro plugin

8: now you can start to create your tooltip terms and set up tooltips, you can find more detailed video wordpress tooltips plugin tutorial at: https://tooltips.org/wordpress-tooltip-plugin/wordpress-tooltip-plugin-document/wordpress-tooltips-video-tutorials/

Hope this have a little help 🙂

Thanks,  have a blessed day with your family 🙂

Best Regards,

WordPress tooltips plugin support

Tagged with: , ,

Beautified Bullet Screen Settings panel, improved code security of Bullet Screen module, wordpress tooltips pro plus 29.9.8 released

Hey, esteemed users of WordPress Tooltip! I hope this message finds you well and enjoying joyful moments with your loved ones!  Yesterday, we got a feedback from a WordPress Tooltip plugin, he praised the functionality of our Bullet Screen, noting that it was the only WordPress Bullet Screen plugin he could find 🙂

What is Bullets-Screen?

Bullets Screen is a feature that displays a barrage effect of user comments, real-time messages, or other text content on a website in a scrolling or floating manner. The benefits of supporting Bullets Screen functionality for a website include:

  1. Increased User Engagement: Bullets allow wordpress content to be displayed on the page intuitively and in real-time, encouraging user interaction.
  2. Attention-Grabbing: The dynamic nature of the bullet screen effect can attract user attention, increasing focus on website content.
  3. Social Aspect: Bullets create a social environment where users feel engaged and involved, enhancing interaction and communication among users.
  4. Entertainment Value: Bullets add an element of fun and entertainment, making the user experience more engaging and diverse. Overall, the Bullets Screen feature can add a dynamic interactive way for websites to enhance user experience and engagement.

Starting from the release of wordpress tooltips pro 5.9.2 back in 2018 (the latest version being 29.9.8 in 2024), we initiated the development of the bullet screen effect for our wordpress tooltip users. The feedback from many users has been overwhelmingly positive, expressing their appreciation for this new feature. 🙂

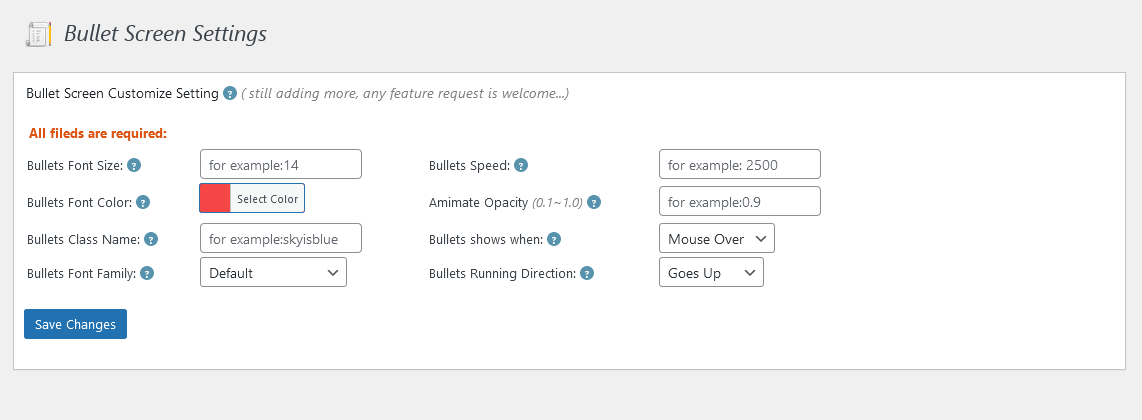
Today, we developed a new version of wordpress tooltips pro plus 29.9.8, in this version, we improved UI of Bullet Screen Settings panel, the new Bullets Screen Settings panel looks like this:

Bullet Screen Settings in wordpress tooltips pro plus 29.8.8

From the screenshot, you can see that the Bullets Screen Settings panel now looks much more lively. 🙂

Also we have improved code security of WordPress Bullets Screen module 🙂

If you have any more question of feature request, please don’t hesitate to contact us 🙂

Best Regards,

WordPress Tooltips Plugin Support

Tagged with: , ,

Step 5 Toward Displaying Tooltips in the Administrator Control Panel, wordpress tooltips pro plus 29.2.8 released

Hi, Dear WordPress Tooltip users, hope this message find you are doing well and having happy days with your loved ones  🙂 A couple of days back, we received an incredibly uplifting plea from a devoted patron of our WordPress tooltips extension. This user ardently wished for our plugin to incorporate tooltip capabilities within the administrative control panel of the WordPress dashboard. The user disclosed their extensive utilization of the WordPress backend, where a number of editors tirelessly toil. As a swift response, we expeditiously unleashed numerous iterations, with an unwavering emphasis on bolstering the impregnability of our WordPress tooltips extension Following the fortification of all our code, we’ll be enabling the wordpress tooltip effect within the WordPress backend for any text therein.

Today our wordpress tooltips plugin developer re-developed our wordpress tooltips pro plus addon panel to enhance code security 🙂

What is wordpress tooltip?

WordPress tooltip pro is a tooltips plugin for wordpress, which be designed to help you create colorful, varied and graceful tooltip styles to present the content to your users, with lively and elegant animation effects, and save your valuable screen space.

When the users hover over an item, the colorful tooltip popup box will display with the animation effect. You can add video, audio, image, and even other content which generated by 3rd wordpress plugins like QR code, Amazon AD, Google Map in tooltip popup box via wordpress standard editor, it is very easy to use.

What does the “WordPress tooltip plugin addon” mean?

In the realm of WordPress, an “addon” for a plugin typically refers to an supplementary extension or feature that enhances the existing functionality of a WordPress plugin. It serves as a means to expand the capabilities of a core plugin by incorporating additional features, tools, or integrations.
When you encounter a menu item labeled “Addon” within a WordPress plugin, it generally signifies that the plugin developer has purposely designed the plugin to be easily extended or customized through these addons. These addons can furnish supplementary functionality that may not be encompassed by the plugin’s core features.
For instance, envision having a WordPress plugin dedicated to managing a contact form on your website. The core functionality could encompass the creation and administration of basic contact forms. However, the plugin developer might offer addons that facilitate integration with third-party email marketing services, provide additional form field types, or enrich the styling options of the form. These addons permit users to tailor the plugin to their precise requirements without burdening the core plugin with every conceivable feature.
To sum up, a WordPress plugin addon denotes an auxiliary component that expands the capabilities of a plugin, granting users the flexibility to customize and enhance the plugin’s functionality based on their specific needs.

Which wordpress tooltip addons do we presently include in the pro plus version?

Within the pro plus version of wordpress tooltips, we presently offer the following wordpress addons:

  • Tooltips for TablePress Addon
  • Tooltips for Contact Form 7 Addon
  • Tooltips for WooCommerce Products Addon
  • Glossary for WooCommerce Products Addon
  • Tooltips for bbPress Topic & Reply Addon
  • Tooltips for BuddyPress Activity Addon
  • Tooltips Language Customization Addon
  • Tooltips for ACF Addon
  • Tooltips for OceanWP Theme Addon
  • Tooltips for Custom Product Tabs for WooCommerce Addon
  • SVG Image Tooltips Addon
  • WikiPedia Tooltips Addon
  • WordPress Comment Tooltips Addon
  • Tooltips PDF Viwer Addon
  • SouldCloud Tooltips Addon
  • Youtube Tooltip Shortcode Addon
  • Vimeo Tooltips Addon
  • Smart Content Link Tooltips Addon

How can I locate the wordpress tooltip addons?

Finding the wordpress tooltip addons is quite straightforward:

  1. Log in to your wordpress site as an administrator. Normally, you can log in to your wordpress site by visiting yourdomain.com/wp-admin (replace yourdomain.com with your actual domain).
  2. Once logged in, you will be redirected to the wordpress dashboard. On the left-hand side of the dashboard, you will spot a tooltips menu item. Click on it if you have already downloaded and installed the wordpress tooltips pro plus plugin.
  3. You will come across additional submenu items. Towards the bottom of the tooltips menu item, you will find the addons submenu item. Here is how it appears:

wordpress tooltip menus 14.3.6


4. Click on the addons submenu item, and you will access the tooltips addon settings panel. It will resemble the following:

Within this panel, you will find all the available wordpress tooltip addons. You can enable or disable your desired wordpress tooltip addons here We are in the process of preparing a more comprehensive documentation on how to utilize these wordpress tooltip addons, and you can expect to see it soon


Thanks, have a blessed day with your family

Best Regards,

WordPress tooltip plugin support


Tagged with: , ,

Support job board directory, wordpress tooltips free 9.4.3 released

Greetings, valued WordPress Tooltip users! May this message reach you in high spirits, as you relish a joyous weekend and create wonderful memories with your cherished family. 🙂 We’ve received a truly remarkable support ticket from a WordPress Tooltip user today:

Hello,
I hope this message finds you well. I wanted to reach out because I am in the process of setting up a job board for our company. After experimenting with a few plugins, I have found that WordPress Job Manager aligns well with our requirements. However, there are a few minor issues I have encountered.

During my search, I came across your plugin, WordPress Tooltips Pro Plus, which states that it supports the job board directory. One of your users suggested a feature that I am also interested in. They mentioned the need to display the job content or at least a summary directly in the job listings, to save job seekers from having to open each post individually. Unfortunately, this option is not available in the “Job Board Plugin,” which is the same problem I am currently facing.

I gave your free WordPress Tooltips plugin a try, and I must say that I really appreciate its tooltips and glossary features. They are excellent! However, I noticed that it only supports the WordPress post directory, user member directory, and WooCommerce product directory. I was wondering if the job board directory feature is unique to the Tooltips Pro Plus version. If so, would it be possible to add this feature to the free version of WordPress Tooltips?
I appreciate your time and consideration. Thank you in advance for your help, and I look forward to hearing from you soon.

Yours sincerely

Yes, in wordpress tooltips pro plus plugin, we support create job board directory for wordpress job manager.

What is wordpress job manager?

WP Job Manager is a **lightweight** job listing plugin for adding job-board like functionality to your WordPress site. Being shortcode based, it can work with any theme (given a bit of CSS styling) and is really simple to setup. Created by automattic 🙂

= Features =

* Add, manage, and categorize job listings using the familiar WordPress UI.
* Post jobs on your own site, then promote them across a worldwide job network — on LinkedIn, Indeed and more.
* Searchable & filterable ajax powered job listings added to your pages via shortcodes.
* Frontend forms for guests and registered users to submit & manage job listings.
* Allow job listers to preview their listing before it goes live. The preview matches the appearance of a live job listing.
* Each listing can be tied to an email or website address so that job seekers can apply to the jobs.
* Searches also display RSS links to allow job seekers to be alerted to new jobs matching their search.
* Allow logged in employers to view, edit, mark filled, or delete their active job listings.
* Developer friendly code – Custom Post Types, endpoints & template files.

The plugin comes with several shortcodes to output jobs in various formats, and since its built with Custom Post Types you are free to extend it further through themes.

What are tooltips?

Tooltips are small popup box with more information like video /  audio / image / google maps / QR code / wiki / text… and so, tooltips box will pop up when users hover over an element in your pages, the element can be a word in your post, a search form input box, an image in your page, a widget on your sidebar.. and so on, wordpress tooltip plugin supports add tooltip effect on any element on the wordpress posts, or display on wordperss menu, comment, contact form, woocmmerce product, bbpress forum, buddypress activity…etc, with pretty effects and many more little amazing components and addons, for example, Bullets Screen

What it WordPress Tooltip Plugin:

WordPress tooltip pro is a tooltips plugin for wordpress, which be designed to help you create colorful, varied and graceful tooltip styles to present the content to your users, with lively and elegant animation effects, and save your valuable screen space.

When the users hover over an item, the colorful tooltip popup box will display with the animation effect. You can add video, audio, image, and even other content which generated by 3rd wordpress plugins like QR code, Amazon AD, Google Map in tooltip popup box via wordpress standard editor, it is very easy to use.

Job board directory for wordpress job manager?

In March 3 2023, wordpress tooltips plugin start to support job board directory for wordpress job manager, users can create a job board directory in 2 minutes. Based on a wordpress job manager user’s feature request : ” job seekers told him that they want to display the job content in the recruitment list, or at least the excerpt of the job position”, he using our directory modules in wordpress tooltips pro plus plugin, so he hope we create a job board directory for wordpress job manager too.

Now we added this function to wordpress tooltips free plugin, this is our description copied from wordpress tooltips pro plus version:

How to create a wordpress job board directory quickly?

WordPress tooltip plugin support create a job board directory from job listings that generated by wordpress job manager, and wordpress tooltip support add tooltip effect on keywords in wordpress job board directory too, so job site employer can insert advertisements, videos, audios, google map, pdf documents, woocommerce payment QR, images, text…etc in wordpress tooltip popup windown, when users mouse hover keyword in job title or job content, or job excerpt, job seekers will find a pop=up window with these important information of jobs

Via wordpress tooltips pro + plugin, it is very easy to set up a wordpress job baord directory in 2 minutes.

1: Customer of WordPress tooltip pro plus  plugin can click download wordpress tooltip to download the new version directly, new user please purchase a license of wordpress tooltip pro plus

2: Downloaded and install  wordpress tooltip pro + plugin which version >= 18.8.8

New users please check our detailed video tutorail at WordPress Tooltips Video Tutorial 3: How to upload and activate wordpress tooltips pro plugin

3: Crete a new wordpres post and insert the wordpress tooltip job board directory shortcode :

in the content of wordpress post, publish the job board directory post

4: Please check the front end of wordpress tooltip job board directory page, you will find the we have listed all job title and job content with navigator bar and search box and page links like #1, #2…etc

5: In the backend of wordpress tooltip plugin, you can setup the wordpress listing directory  via wordpress glossary settings panel, it looks like this:

glossary custom panel in wordpress glossary 16.0.8

wordpress glossary custom panel in wordpress glossary 16.0.8

In here, you can custom the font size in the job board directory, enable / disable wordpress job board directory search box,  select job board directory color template via default built-in pretty templates, or custom each element via customize settings panel, there are many more functions, for example,  enable / disable tooltip effect on job title or job content in the job board directory, custom letters in job board directory navigation bar…etc, just a few click, very easy

Now you can use the same functions in wordpress tooltips free plugin 9.4.3 🙂

What’s different in wordpress tooltips free plugin  and tooltips pro plus plugin? wordpress tooltips free plugin can create wordpress job board direcoty / woocommerce directory / wordpress post directory / woocommerce product directory with basic functions. Tooltips pro plus plugin support more advanced function, for example, only include posts in a specific category id or category name, specify how many records to display in a directory, exclude items from a specified diretory exclude records viaids,customize color, background color of directory…etc, support more kinds of directory…etc

If you have any feature request to wordpress tooltips plugin, please don’t hesitate to tell us, we are very happy to realize it for you 🙂

Thanks, have a blessed day with your family 🙂

Best Regards,

WordPress tooltips plugin support


Tagged with: , , , ,

Adding advanced features to the wordpress tooltips AI, wordpress tooltips pro plus 27.7.8

Hi, Dear users of WordPress Tooltip plugin, hope this message find you are doing well and having wonderful holiday with your family:)  A wordpress tooltip user told us, he is using AI  tooltip to generate content for wordpress post automatically, but he need more functions:

Hi, I am currently using your WordPress tooltips plugin, and it’s been a great tool for me. I utilize the Tooltip AI to automate the creation of tooltip terms and content. However, I recently discovered that Tooltip AI can also generate WordPress posts automatically, which is fantastic. The generated content is accurate and provides a broader perspective. This feature has helped me save a significant amount of time and enhance the quality of my posts.
Now, I have installed an LMS plugin, and I am interested in using your AI Tooltip feature to automatically generate course content. Could you please provide me with some tips on how to fulfill this requirement?

In addition, the layout of the AI TOOLTIP panel is a bit confusing, which doesn’t detract from the use, but if it could be a bit neater, then this would be a perfect and enjoyable experience to use!

Thank you!

Yes, our wordpress tooltips pro plus plugin using OpenAI ChatGPT as AI writer to generate high quality content for wordpress automatically, in the current time, wordpress tooltips plugin can generate wordpress tooltips automatically, and support write  posts / wordpress pages via CHATGPT,  by this way, wordpress tooltips plugin turn your wordpress site into an auto-blog.

We checked the user’s LMS plugin, we found the great LMS plugin do not generate wordpress standard post, it generate custom post type, so we need add the new custom post type via wordpress tooltip AI writer. For help blogger use Tooltips AI easier, we need design a settings panel  for the user, and our developer said we will add more AI write functions in tooltips AI, not only support wordpress custom type post, but also support more functions like schedule post in wordpress and so on. If we add a new sub-menu item in tooltips menu, it is not good for users, we want to use bootstrap tabs in tooltips AI panel, users can set up AI writer in the panel and can use AI content generator to write wordpress posts in the panel directly. We have start to develop the bootstrap tabs and settings panel now.

In the current time, we re-designed the UI of AI tooltips, it looks like this:

AI tooltip settings panel in wordpress tooltips pro plus 27.7.8

AI tooltip settings panel in wordpress tooltips pro plus 27.7.8

Please note, the black bar is come from my screenshot plugin in my browser, it do not existed in the plugin 🙂

Thanks for the great suggestion, if you have any more feature request or question, please don’t hesitate to contact us

Thanks, have a blessed day with your family

Best Regards,

WordPress tooltips plugin support

Tagged with: , , , ,

How can I create a glossary page and what is a glossary index page?

Hi, Dear  WordPress Tooltip plugin users,

I hope this message finds you well and enjoying quality time with your family. Recently, we received feedback from an amazing WordPress Tooltip user who expressed confusion about our glossary index page and create glossary pages via glossary shortcode. We apologize for any confusion caused and would like to assure you that we are committed to resolving this issue.

In response to the feedback, we are planning to write a detailed document explaining what a glossary index page is and how to create a glossary using the glossary shortcode. We also aim to propose a solution that will prevent any future confusion. If you find our proposed solution helpful, we are more than willing to develop a new version of the plugin that addresses this problem.

Before we begin, we would like to extend our heartfelt gratitude to Mr. Carlos for tirelessly pointing out our issues, which prompted us to rectify them. 🙂

What is glossary?

In general, a “Glossary” refers to a list or collection that contains terms, definitions, and explanations. It is used to explain and clarify specific terms used in documents, books, websites, or other forms of text. The main purpose of a Glossary is to help readers understand and remember the specialized terms, acronyms, and concepts used in the text. It provides accurate definitions of terms and explains their meaning and usage. By using a Glossary, readers can eliminate ambiguity, improve reading comprehension, and enhance their ability to use the text. A Glossary serves the following functions:

  1. Defining terms: It provides clear and concise definitions of terms to help readers understand their meaning and usage.
  2. Explanations and examples: It offers explanations and examples for each term to help readers better understand the concepts and meanings behind them.
  3. Sorting and organizing: Terms are arranged in alphabetical order, enabling readers to quickly find the desired term.
  4. Cross-referencing: It provides links to other related terms to help readers establish connections between terms.
  5. Labels and annotations: Terms are categorized and supplemented with labels and annotations, making the Glossary more clear and user-friendly. A Glossary can be applied to various types of texts and scenarios, including:
  • Academic papers and textbooks: It helps readers understand complex academic terms and concepts.
  • Technical manuals and user guides: It provides explanations of specific terms and functions to assist users in better utilizing products or services.
  • Professional magazines and journals: It explains and elucidates industry-specific terms and concepts for readers.
  • Online resources and e-learning courses: It provides definitions and explanations of terms on websites and educational platforms to help learners better understand the content. In summary, a Glossary is a tool that aids readers in understanding and explaining terms. It plays a crucial role in various texts and fields. It provides accurate definitions and explanations of specific terms, enhancing the effectiveness of reading and learning, and facilitating effective knowledge transfer and communication.

The WordPress Glossary plugin extends the traditional functionality of glossaries, you can make a glossary page by insert a shortcode “glossary” in any wordpress pages, in front end , it looks like this:

The ideals which have lighted my way, and time after time have given me new courage to face life cheerfully, have been Kindness, Beauty, and Truth. The trite subjects of human efforts, possessions, outward success, luxury have always seemed to me contemptible.
Do something wonderful, people may imitate it.
To follow, without halt, one aim: There is the secret of success.
This is wordpress audio tooltip demo, audio is loading, please wait a moment. Your browser does not support the audio element.
Robert Louis Stevenson
Since wordpress tooltips pro 5.9.2 (the current version is 17.1.4), we start to support bullet screen effect, what is bullet screen? In some countries, for example Korean, China... and so on, a few site start to allows show text messages fly across the screen like bullets, we call it bullet screen, a example site which Read More
Bullet Screen lets you add scrolling comments, quotes, or tips to any WordPress post, offering users a unique and engaging experience
Strawberry & Cream Torte $9 only! On sale! Limited Time Offer! SHOP NOW

WordPress glossary plugin extends the traditional functionality of glossary, for example:

  • 5 preset Glossary stylesheet and beautiful color schemes:: Blue, Blonde, Dark, Red, Green, change your glossary template via one click in glossary setting panel.
  • Easy to custom Glossary style:: In Glossary settings panel, you can customize font size of glossary navigation bar item, font size of glossary navigation bar selected item, You can custom “Glossary Term Underline Color”, “Glossary Term Font Color”, “Glossary Term Font Size”, “Glossary Content Font Color”… and so on, users can decide include or exclude numbers in glossary navigation bar, or you can hide the letters in the Glossary Nav Bar that don’t have any tooltips associated with them, i.e., where the number of tooltips is zero… and so on, it looks like this:
  • Glossary support multi-language: English, Swedish, French, German, Finnish, Spanish,Russian
  • Glossary index page, SEO friendly: Check Demo, By default, our plugin will generate a powerful glossary index page at http://yourdomain.com/glossary/, you can change it to any your pages, just one click in glossary setting panel, glossary index page support page navigation, it is SEO friendly and help you get better SEO rank
  • Glossary category filter / selector: In glossary index page, at the top of glossary items, user can select different glossary category from glossary category dropdown box, when user selected a category, glossary index page will only show related glossary in specified glossary category
  • Glossary term pages, SEO friendly: Each glossary item have their own glossary page, the link structure looks like this: http://yourdomain.com/glossary/terms1/ , http://yourdomain.com/glossary/terms2/ , also in glossary term page, we added tooltip glossary breadcrumbs, it looks like Home / Glossary / glossary term name, you can click to back to glossary page, or click to back to home page,  it is SEO-Friendly, please check demo of glossary breadcrumbs
  • Option to enable / disable bread crumbs in glossary term pages: In backend, you will find option “Enable Bread Crumbs on Glossary Term Page” in in Glossary Settings panel,, if you select yes, in front end of glossary term pages, we will show bread crumbs on glossary term pages, if you select no, then in front end, we will disable bread crumbs on glossary term pages.
  • Easy to manage Glossary Pages: In Glossary settings panel, you can enable / disable glossary index page and glossary term links by one click, one click to display / hide images in glossary page… and more
  • Glossary Support Responsive : Our glossary works well on mobile devices
  • Glossary Page support list style or table style: you can use shortcode “tooltipstable” to generate a glossary page, this shortcode will generate a glossary which have two-column table, left is term, right is content of the term. Also you can use shortcode “tooltipslist” to generate a glossary page which with a tooltips list format
  • Glossary / Directory / List support multi-language: followed users requested, our glossary section support English, Swedish, German, Frensh, Finish,Russian in Directory, you can chose your language in optional settings now, if you hope our directory support your language, please contact us
  • Options to enable / disable tooltips effect on glossary pages: In Glossary Settings panel, you can enable or disable tooltips effect on glossary pages by one click
  • Quick load speed: everything is CSS, no image are used, in “Tooltips Global Settings” panel, you can speed up the page load speed via chose to “Load Tooltip Javascript In WordPress Header” or “Load Tooltip Javascript In WordPress Footer”, optimized codes let topltips pro works better with many cache plugins to speed up your site. In wordpress post editor, support disable tooltip to speed up page load speed, in optionanl setting panel, support one click to bulk disable tooltips in post by post ids… and so on, wordpress tooltips plugin have moved all in-line js code and js main functions to the wordpress footer, so your browser will not need waiting for the js code, this will speed up wordpress pages loading speed, also we support add  defer to wordpress tooltip js files, tooltip admin can enable defer in backend
  • Custom tooltip glossary template with your own code in back end: Some coders hope have a method to custom tooltip & glossary template with their own css codes, so do not need to replace css codes in tooltip & glossary template files again
  • There are many additional glossary features that include various functionalities. Some of these glossary features can be referenced by taking a screenshot of the glossary settings:

Also this glossary settings can be used on our directory functions, you can find how the woocommerce product directory work in the demo woocommerce directory .

What is glossary index page?

The term “Glossary Index Page” refers to a dedicated page or section that stores past indexes of terms used in a glossary. The glossary index page serves as a centralized source of information, allowing users to easily retrieve previously used term indexes. These indexes are typically organized in chronological order and can be included as appendices in documents or publications, providing readers with the ability to review previous term definitions and explanations.

The primary purpose of a glossary index page is to preserve and provide access to past term indexes. It assists readers in finding previous term definitions, helps them review related concepts, and acts as a convenient reference resource. Additionally, glossary index pages can be utilized to track the evolution and changes of terms over time, while also providing a reference for maintaining consistency in documents or publications. Overall, the function of a glossary index page aids in organizing and managing term indexes, making them more accessible and useful.

Why was the function of a glossary index page developed? Several years ago, an enthusiastic user of our amazing WordPress Tooltip plugin shared his experience using our WordPress glossary feature for language teaching purposes. He created a dictionary with many glossary terms and expressed his desire for each term to have its dedicated link. Furthermore, he wished for all these glossary terms, titles, content, and links to be listed in one glossary index page to improve SEO ranking. It was due to this valuable feedback that we designed and implemented the function of a glossary index page.

How did we design the wordpress glossary index page?

Based on the valuable feedback from that amazing WordPress Tooltip user, we developed the glossary index page as a Glossary Archive Page. When users install the WordPress Tooltip plugin, it automatically creates a page called “Glossary.”

By default, the WordPress glossary plugin enables the function of the glossary index page and uses the “Glossary” page as the default glossary index page.

In the Glossary Settings panel, users have the option to enable or disable the glossary index page because some users may require it while others may not.

Furthermore, in the glossary settings panel, the WordPress Glossary admin can find the option for “Glossary Index Page.” Here, the WordPress Glossary plugin lists all pages in a select box, allowing users to choose a page as the glossary index page. On the front-end, the glossary index page appears as a glossary archive page — the glossary index page looke like this.


How do we plan to improve the wordpress glossary index page?

We know seom users confused by this design — because the words “Glossary Index Page” , in their language and understanding, a “Glossary Index Page” is supposed to have all the functionality of a glossary — that is, the functionality of a glossary created with the glossary’s shortcode.

Sorry for the confusion, we will change the function like this way:

When a new user installs and activates the wordpress tooltip plugin for the first time, we will automatically create two pages, the first is “glossary” — we will automatically add the glossary shortcode to this page, so that this automatically created “glossary” page will have full glossary. We will put a link to the default glossary page at the top of the glossary settings panel, so that users can use glossary without any setup work.

Second, we will automatically create a second page called “glossary list” or “glossary index”, and automatically set this page to be the glossary archive page.

And we will link the glossary index page option to our detailed tutorials and DEMOs, so that when users are confused, they can click on the links to view our tutorials and DEMOs directly, and immediately understand the use of the glossary index page and the difference between the default glossary page.

Do you think this will solve the problem? If you have any other comments, feel free to guide us, we will try our best to provide an easy to use product for our users!

Once again, we apologize for any inconvenience this may have caused and thank you for your understanding and support. If you have any further questions or suggestions, please don’t hesitate to reach out to us. We value your feedback and are dedicated to improving our plugin to meet your needs.


Tagged with: , , , , , ,

Unterstützung für den TTS (Text-to-Speech)-Dienst für den Inhalt im Tooltip-Popup-Fenster, WordPress Tooltips Pro Plus 25.9.8 veröffentlicht

Hi, liebe WordPress Tooltip-Plugin-Benutzer,

ich hoffe, diese Nachricht erreicht Sie in wohl und Sie haben wundervolle Tage mit Ihrer Familie. Wir freuen uns, Ihnen mitteilen zu können, dass wir einen fantastischen Vorschlag von einer unserer beeindruckenden WordPress Tooltip-Benutzerinnen erhalten haben. Sie hat eine Rezepte-Website erstellt, auf der tausende Rezepte aus der ganzen Welt gesammelt werden, und viele Benutzer verlassen sich mittlerweile auf ihre Seite, insbesondere an Wochenenden, wenn sie Küchen mieten, um zu kochen und feiern. Diese Benutzer loben ihre Rezepte als exzellent und detailliert. Allerdings sind sie oft beschäftigt, wenn es darum geht, eine große Menge an Essen zuzubereiten. Daher haben sie vorgeschlagen, dass es großartig wäre, wenn die Rezepte automatisch vorgelesen werden könnten. Um diesen Vorschlag umzusetzen, hat sie unser WordPress Tooltip-Plugin auf ihrer Rezepte-Website verwendet. Durch einfaches Klicken auf den Namen eines Gerichts auf ihrem Handy öffnet sich ein Tooltip-Fenster, das ein detailliertes Rezept anzeigt. Nun möchte sie es ihren Benutzern noch leichter machen, indem sie einen Sprach-Autobroadcast-Button zum Tooltip-Fenster hinzufügt. Mit diesem Button könnte der Inhalt des Rezepts automatisch vorgelesen werden. Wir freuen uns, ankündigen zu können, dass wir eine neue Version des WordPress Tooltip Pro Plus-Plugins, Version 25.9.8, entwickelt haben, das den TTS (Text-to-Speech)-Dienst für den Inhalt in den Tooltip-Popup-Fenstern unterstützt. Wir sind begeistert, unseren Benutzern TTS-Tooltips anzubieten und arbeiten hart daran, immer mehr Funktionen hinzuzufügen, um die Tooltips noch besser zu machen. Bald werden Sie auswählen können, ob eine männliche oder weibliche Stimme verwendet wird, die Sprechgeschwindigkeit anpassen und vieles mehr!

Was ist TTS?

TTS steht für Text-to-Speech und bezeichnet den Prozess, geschriebenen Text in gesprochene Worte umzuwandeln. Die Aktivierung des TTS-Dienstes für den Inhalt in den Tooltip-Popup-Fenstern kann das Benutzererlebnis verbessern, indem eine alternative Möglichkeit zur Informationsaufnahme geboten wird. Außerdem macht es Ihre Website für diejenigen zugänglicher, die Schwierigkeiten beim Lesen haben oder es bevorzugen, den Inhalt zu hören.

Was ist Text-to-Speech?

Text-to-Speech (TTS) ist ein Dienst, der geschriebenen oder gesprochenen Text in ein Audioformat umwandelt, das abgespielt werden kann. Er ermöglicht es Personen, die nicht lesen können oder eine Sehbehinderung haben, den Text auf einer Website oder einer anderen Plattform zu nutzen. TTS-Systeme können in verschiedene Websites und Anwendungen integriert werden, um Audio-Versionen des Textes anzubieten. Das ist insbesondere für Benutzer hilfreich, die nicht lesen können oder barrierefreien Content benötigen, der vorgelesen wird. Durch die Implementierung von TTS wird Ihre Website für Benutzer mit Behinderungen zugänglicher gemacht und insgesamt ein besseres Benutzererlebnis geschaffen. Wir hoffen, dass Ihnen diese neue Funktion gefällt und Sie Freude daran haben, das verbesserte WordPress Tooltip Pro Plus-Plugin zu verwenden. Wir schätzen Ihre Unterstützung und Ihr Feedback, während wir weiterhin unsere Produkte verbessern.

Wie aktiviert man Text-to-Speech-ToolTips?

1: Wenn Sie das WordPress ToolTips Pro Plus Plugin verwenden, klicken Sie bitte auf den Link WordPress ToolTip Download, um die neueste Version des WordPress ToolTips Pro + Plugins herunterzuladen. Wir werden später versuchen, diese Funktion in der WordPress ToolTips Pro Version und der WordPress ToolTips Free Version zu unterstützen. Was ist der Unterschied zwischen der Pro Version und der Free Version? Das WordPress ToolTips Pro Plus Plugin bietet mehr Funktionen und Optionen, wie z.B. die Auswahl zwischen männlicher Stimme, weiblicher Stimme, Sprechgeschwindigkeit usw., immer mehr

2: Laden Sie das WordPress ToolTips Plugin (ZIP-Datei) über das Plugin-Panel in Ihrem WordPress-Dashboard hoch. Wenn Sie ein neuer Benutzer von WordPress ToolTips sind, überprüfen Sie bitte unser Video zur Installation von WordPress ToolTips auf: WordPress ToolTips Video Tutorial 3: Wie man WordPress ToolTips Pro Plugin hochlädt und aktiviert

3: Melden Sie sich auf Ihrer WordPress-Website an, im WordPress-Dashboard klicken Sie bitte auf den Menüpunkt ToolTips, dann auf den Untermenüpunkt “Globale Einstellungen”. Sie öffnen dann das globale Einstellungsfenster von WordPress, das wie folgt aussieht:


Wie Sie sehen können, haben wir am unteren Rand des globalen Einstellungsfensters von WordPress ToolTips eine neue Option hinzugefügt: “Text-to-Speech-ToolTips aktivieren/deaktivieren (ToolTip-Inhalt für Ihre Benutzer vorlesen)”. Bitte aktivieren Sie diese TTS-Option. Dann werden die Benutzer in der Front-End-Version einen “Klicken Sie, um zuzuhören”-Button unten rechts im WordPress ToolTips Pop-up-Fenster finden. Es sieht so aus:


Wie Sie sehen können, wenn Benutzer mit der Maus über den ToolTip-Begriff “Wie man Erdbeereis herstellt” fahren, öffnet sich das ToolTip-Fenster mit dem ausführlichen Rezept für Erdbeereis. Unten rechts im Erdbeereis-Rezept finden Sie den grünen Button “Klicken Sie, um zuzuhören”.
Wenn Sie auf den “Klicken Sie, um zuzuhören”-Button klicken, beginnt das WordPress ToolTip, das gesamte Erdbeereis-Rezept laut vorzulesen! Der Text auf dem Button ändert sich dann von “Klicken Sie, um zuzuhören” zu “Klicken Sie, um anzuhalten”. Durch Klicken auf “Klicken Sie, um anzuhalten” können Sie die Wiedergabe pausieren, und der Text auf dem Button ändert sich wieder von “Klicken Sie, um anzuhalten” zu “Klicken Sie, um zuzuhören”. Sie können erneut auf den Button klicken, um mit den gesprochenen ToolTips fortzufahren

Vielen Dank für den großartigen Vorschlag, wir arbeiten hart daran, immer mehr erstaunliche Funktionen hinzuzufügen, um die TTS-ToolTips zu verbessern. Wenn Sie weitere Fragen oder Anregungen haben, zögern Sie bitte nicht, uns zu kontaktieren. Wir freuen uns sehr, sie für Sie umzusetzen

Vielen Dank und ein gesegnetes Wochenende mit Ihrer Familie

Mit freundlichen Grüßen,
Unterstützung des WordPress ToolTips-Plugins

Tagged with: , , ,
Top