Tag: wordpress tooltip

How to Create and Edit Beautiful Tooltips with the WordPress Gutenberg Editor in 3 Minutes Using WordPress Tooltips Pro Plus 31.4.8

Hey, dear  WordPress Tooltip plugin users , I hope this message finds you are doing well and that you having a  happy day with your family 🙂   “We received a suggestion from a WordPress Tooltips plugin user -> ‘It would be absolutely fantastic if your Tooltip plugin could allow users to create tooltips directly within the Gutenberg interface,’ she said:

A Bright Idea for Tooltip Creation in Gutenberg!

Dear Tooltip Plugin Developers,

I hope this message finds you well and thriving! As an avid user of both WordPress and the powerful Gutenberg editor, I wanted to share a little suggestion that I believe could make a brilliant difference for many users.

Gutenberg offers such a wealth of dynamic features that the traditional WordPress editor simply can’t match, especially with its delightful drag-and-drop functionality. The ability to effortlessly rearrange blocks and customize layouts is a game changer! Not to mention, the reusable blocks allow us to keep our posts consistent and save precious time—a win-win if you ask me.

With all these fantastic capabilities, it would be absolutely fantastic if your Tooltip plugin could allow users to create tooltips directly within the Gutenberg interface. Imagine how convenient it would be for users to seamlessly incorporate tooltips into their content, all while utilizing the inherent strengths of Gutenberg.
This integration could empower the community even further, making it easier to enhance posts with helpful information at our fingertips. It would not only enrich the user experience but also elevate the content we create.

Thank you for considering this suggestion! I believe it could truly take your plugin to the next level and make the lives of many WordPress users that much brighter.

Cheers and best wishes,

Our developer of the WordPress Tooltip plugin reviewed her ticket, and we believe this is a great suggestion. As a result, we developed WordPress Tooltips Pro Plus version 31.4.8 to implement the user’s amazing feature request 🙂

How to Create and Edit Beautiful Tooltips with the WordPress Gutenberg Editor in 3 Minutes Using WordPress Tooltips Pro Plus 31.4.8

1: Login wordpress as admin.

2: In the WordPress dashboard, go to the “Tooltips” menu. Then, click on the “Optional Settings” sub-menu item.

3: In ‘Optional Settings,’ you will find a new option: ‘Enable Gutenberg Editor for Tooltips’ at the bottom of the panel. Please enable this option.

4: When you create or edit a WordPress tooltip term, you will notice that you are using the WordPress Gutenberg editor, not the classic editor. 🙂

Please note, this function only supported by  WordPress Tooltip pro plus plugin version >= 31.4.8


Thanks for the great suggestion, supporting Gutenberg for creating and editing wordpress tooltips can greatly enhance user experience and functionality:

1. Improved User Experience

Intuitive Interface: Gutenberg’s block-based editor provides a more visual and user-friendly interface compared to the classic editor. Users can easily see how their content will look as they build it.

Drag-and-Drop Functionality: Users can easily rearrange blocks, which makes it simpler to customize the layout of their posts and pages without needing to know HTML or CSS.

2. Enhanced Customization

Blocks for Custom Content: With Gutenberg, developers can create custom blocks that allow users to add specific features or layout options tailored to their needs. This can significantly enhance what users can do with their wordpress tooltips.

Reusable Blocks: Users can create reusable blocks for frequently used content snippets, making it easier to maintain consistency across posts and saving time.

3. Better Content Management

Previewing Changes: Users can preview their changes in real time, which helps in ensuring that the end result meets their expectations before publishing.

Version Control: Gutenberg provides better support for revisions, allowing users to easily track changes over time and revert to previous versions if necessary.

4. Future-Proofing

Alignment with WordPress Trends: The shift towards the block editor is part of WordPress’s evolution. Supporting Gutenberg helps ensure that the plugin remains relevant and compatible with future updates to the WordPress core.

Access to New Features: As WordPress continues to develop new features for the block editor, supporting Gutenberg allows users to take advantage of these enhancements seamlessly.

5. Increased flexibility

Supports Additional Features: By adopting Gutenberg, wordpress tooltips can utilize additional capabilities within the editor, such as rich media, layout options, and dynamic content, which were more challenging to implement in the classic editor.

Easier Integration with Other Plugins: Many modern WordPress plugins are designed to work with Gutenberg. Supporting Gutenberg can ensure better compatibility and functionality with these tools.

Conclusion

Overall, supporting Gutenberg for wordpress tooltips not only meets user expectations for a modern editing experience but also empowers them with tools to create richer, more engaging content. This aligns with broader trends in web content management and enhances the flexibility and power of WordPress as a content management system.

 

Tagged with: , , ,

Wie kann man verhindern, dass Tooltips auf einem bestimmten Bild angezeigt werden?

Hallo, liebe WordPress Tooltip Nutzer, ich hoffe, es geht euch gut und ihr habt ein schönes Wochenende mit eurer Familie Ein erstaunlicher WordPress Tooltip-Nutzer hat uns geschrieben: „Hallo, ich möchte den Tooltip (den Text „home“), der beim Überfahren des Logos (jeder Seite) erscheint, entfernen. Ich benutze Tooltips für einige Bilder auf meiner Seite, also müsste ich den Tooltip NUR für das Logo-Bild entfernen. Danke im Voraus für eure Hilfe.“

Unser Unterstützungsteam für das wordpress tooltip plugin antwortete:

Hallo,
Danke für die Nachricht
Wir freuen uns, dir helfen zu können
Entschuldige das Problem. Könntest du bitte versuchen:
1: Im globalen Einstellungsbereich für WordPress Tooltips gehe zu der Option „Tooltips für Bilder aktivieren“ und wähle dann „Ich möchte Tooltips für Bilder deaktivieren“.
Wenn du die Tooltip-Funktion für Bilder trotzdem aktivieren möchtest, kannst du versuchen:
2: Im globalen Einstellungsbereich für WordPress Tooltips finde die Option „Tooltips für Bild Einstellungen“, wähle „rel-Attribut im img-Tag als Inhalt von Tooltips für Bilder verwenden“.
Wir haben ein detailliertes, schrittweise Dokument mit Screenshots unter:
Wie man die Anzeige von WordPress Tooltips auf dem Site-Logo und anderen Bildern vermeidet?
Ich hoffe, das hilft ein wenig
Danke, hab einen gesegneten Tag mit deiner Familie
Mit freundlichen Grüßen,
WordPress Tooltip Plugin Support

Der WordPress Tooltip Nutzer antwortete:

Betreff:
Tooltip NUR vom Site-Logo entfernen
Nachricht:
Hallo,
Ich möchte den Tooltip (den Text „home“), der beim Überfahren des Logos (jeder Seite) erscheint, entfernen.
Ich benutze Tooltips für einige Bilder auf meiner Seite, also müsste ich den Tooltip NUR für das Logo-Bild entfernen.
Danke im Voraus für eure Hilfe.

Dann überprüfte unser WordPress Tooltip-Entwickler dieses Ticket, und wir entschieden, eine neue Version zu entwickeln, um zu verhindern, dass Tooltips auf bestimmten Bildern erscheinen, da wir glauben, dass mehr Nutzer ähnliche Anforderungen haben, und wir antworteten:

Hallo,
Danke für die Antwort
In diesem Fall haben wir eine andere Lösung. Wir werden ein detailliertes Dokument für dich schreiben und dir erneut antworten
Danke, hab einen gesegneten Tag mit deiner Familie
Mit freundlichen Grüßen,
WordPress Tooltip Plugin Support

Deshalb haben wir eine neue Version des WordPress Tooltips Plugins entwickelt: WordPress Tooltips Pro Plus 31.3.8


Wie kann man verhindern, dass Tooltips auf bestimmten Bildern erscheinen?

1: Wenn du Kunde des WordPress Tooltip Pro Plus Plugins bist, klicke bitte auf den Link „WordPress Tooltip herunterladen“, um die neueste Version des Plugins zu erhalten. Stelle sicher, dass die Versionsnummer gleich oder größer als 31.3.8 ist. Wenn du ein neuer Benutzer bist, musst du eine Lizenz für das WordPress Tooltip Pro Plus Plugin erwerben.

2: Melde dich als WordPress-Admin auf deiner WordPress-Seite an und klicke im WordPress-Dashboard auf das Menü „Plugins“.

3: Deaktiviere und lösche die vorhandene Version des WordPress Tooltip Pro Plus Plugins aus dem WordPress-Plugin-Bereich.

5: Klicke auf die Schaltfläche „Neu hinzufügen“, um die WordPress Tooltip Pro Plus Plugin-Version >= 31.3.8 hochzuladen, und aktiviere das Plugin.

6: Wenn du ein neuer Benutzer des WordPress Tooltip Plugins bist, schaue dir unser Video zur Installation des WordPress Tooltip an: WordPress Tooltips Video-Tutorial 3: Wie man das WordPress Tooltips Pro Plugin hochlädt und aktiviert.

7: Gehe im WordPress-Dashboard zum Menü „Tooltips“. Klicke dann auf den Unterpunkt „Optional Einstellungen“. Das WordPress Tooltip-Menü erscheint wie folgt:

tooltips menu in wordpress tooltips pro plus 27.5.8

Tooltip-Menü in WordPress Tooltips Pro Plus 27.5.8

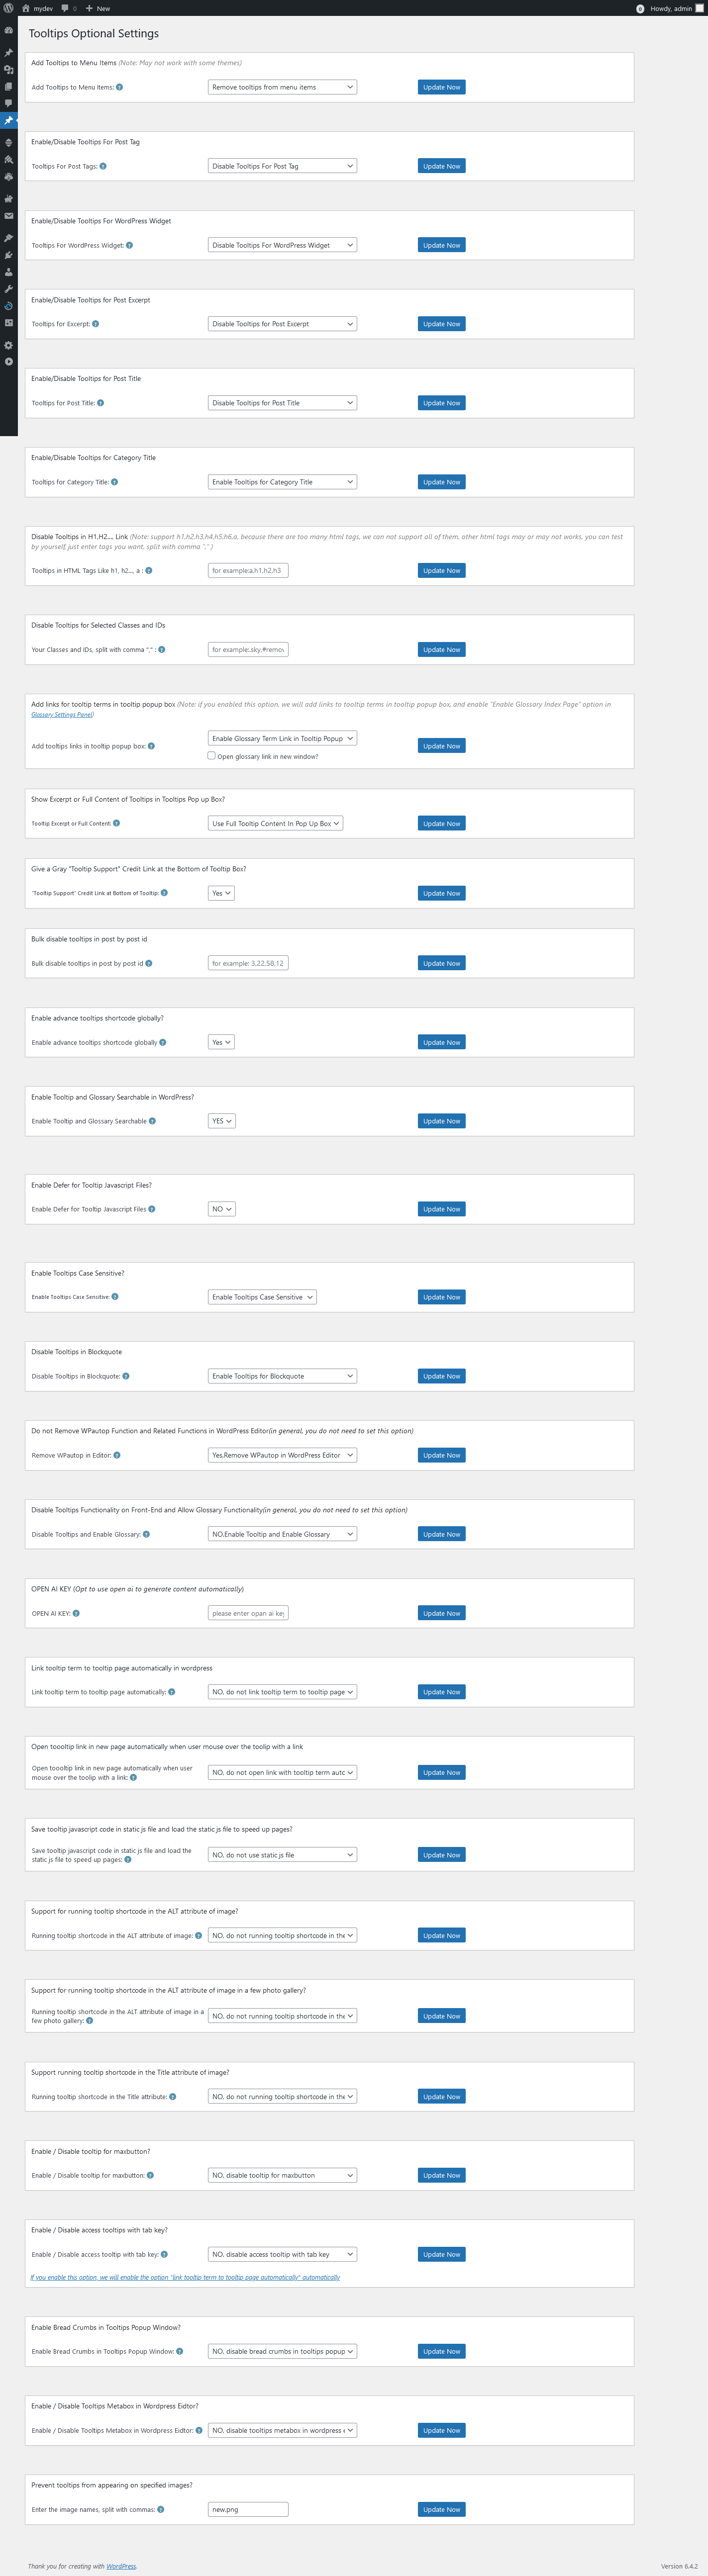
9: Im optionalen Einstellungsbereich von WordPress findest du die neue Option „Tooltips auf bestimmten Bildern verhindern“. Sie sieht so aus:

Prevent tooltips from appearing on specified images
Tooltips auf bestimmten Bildern verhindern

Wie du in der Option „Tooltips auf bestimmten Bildern verhindern“ sehen kannst, kannst du die Bildnamen eingeben. Wenn du mehrere Bilder hast, trenne die Namen mit Kommas.

In welchen Situationen sollte diese Einstellung verwendet werden?

Bitte beachte, dass diese Einstellung nur wirksam wird, wenn du den Wert von „Tooltips für Bild Schlüsselwortübereinstimmung Modus“ auf „ALT-Attribut im img-Tag als Inhalt von Tooltips für Bilder verwenden“ setzt, was die von dem Benutzer angeforderte Einstellung ist.“

Ich hoffe, das hilft ein wenig.

Danke für die großartige Funktionsanfrage, und entschuldige die verspätete Antwort. Unser WordPress Tooltip Plugin-Entwickler hat dir eine Lizenz in deinem Konto als Entschuldigung hinzugefügt. Das WordPress FAQ-Plugin ist eine leistungsstarke und schnelle jQuery FAQ-Lösung, um WordPress-Bloggern zu helfen, FAQs einfach zu erstellen / zu verwalten / zu bearbeiten, wähle das standardmäßige schöne FAQ-Template und den benutzerdefinierten FAQ-Stil im Backend mit wenigen Klicks. Mit dem WordPress FAQ Plugin ist es sehr einfach, Akkordeon-FAQs zu erstellen und anzuzeigen, FAQs nach Kategorien zu gruppieren… usw., einfach zu bedienen, wähle schöne FAQ-Templates aus vorgefertigten Vorlagen, benutzerdefinierter FAQ-Stil im Backend mit wenigen Klicks, unterstützt die Verwendung von OpenAI ChatGPT zur automatischen Erstellung hochwertiger Inhalte für WordPress F.A.Q und WordPress-Beiträge, unterstützt WooCommerce Produkt-FAQs, responsive FAQs, mehrere FAQ-Vorlagen, FAQs nach Kategorien gruppiert, bestimmte Anzahl von FAQ-Artikeln für jede FAQ… und noch vieles mehr. Weitere Details findest du unter:

WordPress FAQ Pro Plugin mit WordPress Tooltips (Version 4.6.6)

Danke, hab einen gesegneten Tag mit deinen Liebsten.

Mit freundlichen Grüßen,
WordPress Tooltips Plugin Support-Team

Tagged with: , ,

How to prevent tooltips from appearing on specified image? WordPress tooltips pro plus 31.3.8 released

Hi, dear WordPress Tooltip  users, I hope you are doing well and having happy weekend with your family  🙂  An amazing wordpress tooltip user wrote to us : “Hello, I’d like to remove the tooltip (“home” text) which appears hovering on site logo (every page). I use tooltips for some images on my site so I’d need to remove the tooltip ONLY on the site logo image. Thanks in advance for your help.”

Our wordpress tooltip plugin support team replied:

Hi,

Thanks for the message 🙂

We are very happy to help you 🙂

Sorry for the problem, , would you please try:

1: In wordpress tooltip global settings panel, navigate to “enable tooltips for image” option, then select “I want to disable tooltips for image”

If you want to enable tooltips function for image yet, then you can try:

2: In wordpress tooltip global settings panel, locate to “tooltips for mage setting“ option, select “use rel attribute in img tag as content of tooltips for image”

We have detailed step by step document with screenshot at:
How to Avoid WordPress Tooltip Displayed on the Site Logo and Other Images?

How to Avoid WordPress Tooltip Displayed on the Site Logo and Other Images?

Hope this have a little help 🙂

Thanks, have a blessed day with your family 🙂

Best Regard,

WordPress tooltip plugin support

The wordpress tooltip user replied:

Subject:
remove tooltip from site logo ONLY

Message:
Hello,
I’d like to remove the tooltip (“home” text) which appears hovering on site logo (every page).
I use tooltips for some images on my site so I’d need to remove the tooltip ONLY on the site logo image.
Thanks in advance for your help.

Then our wordpress tooltip developer checked this ticket, and we decided to develop a new version to prevent tooltips from appearing on specified images, because we believe more users have similar requirement and we replied:

Hi,

Thanks for the reply 🙂

In this case, we have another solution, We will write a detailed document for you and we will reply you again 🙂

Thanks, have a blessed day with your family 🙂

Best Regards,
Wordpress tooltip plugin support

That’s why re developed a new version of wordpress tooltips plugin: WordPress tooltips pro plus 31.3.8 🙂

How to prevent tooltips from appearing on specified image?

1:If you are a customer of the WordPress Tooltip Pro Plus plugin, please click on the “download wordpress tooltip” link to get the latest version of the plugin. Make sure the version number is equal to or greater than 31.3.8. If you are a new user, you will need to purchase a license for the WordPress Tooltip Pro Plus plugin.

2: Log in to your WordPress site as wordpress admin and click the “Plugins” menu in the wordpress dashboard.

3: Deactivate and delete the existing version of the WordPress Tooltip pro plus plugin from the wordpress plugin panel.

5: Click the “Add New” button to upload the WordPress Tooltip pro plus plugin version >= 31.3.8 , and activate the plugin.

6: If you are new user of wordpress tooltip plugin, please check our  video of how to install wordpress tooltip at:  WordPress Tooltips Video Tutorial 3: How to upload and activate wordpress tooltips pro plugin

7: In the WordPress dashboard, go to the “Tooltips” menu. Then, click on the “Optional Settings” sub-menu item. The WordPress Tooltip menu appears as follows:

tooltips menu in wordpress tooltips pro plus 27.5.8

tooltips menu in wordpress tooltips pro plus 27.5.8

9: Within the WordPress optional settings panel, you will find we have added a new “Prevent tooltips from appearing on specified image” option. It looks like this:

Prevent tooltips from appearing on specified images

Prevent tooltips from appearing on specified images

As you can see in the ‘Prevent tooltips from appearing on specified images’ option, you can enter the image names. If you have multiple images, separate the names with commas.

In what situations should this setting be used?

Please note that this setting will only take effect when you set the value of ‘tooltips for image keyword matching mode’ to ‘Use ALT attribute in img tag as content of tooltips for image,’ which is the setting requested by the user.”

Hope this have a little help

Thanks for the great feature request, and sorry for the delayed response, our wordpress tooltip plugin developer have added a  license in your account as a Sorry, WordPress FAQ plugin is a powerful & fast jQuery FAQ solution to help wordpress blodder create / manage / edit FAQs easily, select default pretty FAQ template and custom FAQ style in back-end via a few clicks. With wordpress faq plugin, it is very easy to create and show accordion FAQs, display FAQs grouped by category…etc, easy to use, select pretty FAQ templates from pre-designed template, custom FAQ style in back-end via a few clicks, Support use OpenAI ChatGPT to generate high-quality content for WordPress F.A.Q and wordpress post automatically, support WooCommerce Product FAQ, Responsive FAQ, Multiple FAQ Templates, FAQs grouped by category, specified number of FAQ items for each FAQ… and more and more, you can find more details at:

WordPress FAQ Pro Plugin With WordPress Tooltips (version 4.6.6)

Thanks, have a blessed day with your loved ones

Best Regards,
Wordpress Tooltips Plugin Support Team

Tagged with: , ,

Jak zamienić link „Glosariusz” w okruszkach nawigacyjnych glosariusza w wtyczce WordPress Tooltips?

Cześć, drodzy użytkownicy wtyczki , Mam nadzieję, że ta wiadomość zastaje Was w dobrym zdrowiu i że spędzacie radosny weekend z rodziną. Ostatnio wydaliśmy wersję 31.0.8 wtyczki WordPress Tooltips Pro Plus w odpowiedzi na opinie użytkowników. Użytkownik początkowo skontaktował się z nami, prosząc o pomoc w skonfigurowaniu swojej strony glosariusza, wyrażając trudności w uzyskaniu pożądanego wyglądu. Nasz zespół wsparcia poprowadził go przez kroki stworzenia nowej strony i wstawienia shortcode’u. Po kilku wymianach wiadomości użytkownik pomyślnie skonfigurował swój indeks glosariusza, ale chciał zamienić linki kategorii glosariusza w okruszkach nawigacyjnych na linki do innej strony SEO.

Aby to rozwiązać, nasz zespół wsparcia poinformował użytkownika, że pracujemy nad aktualizacją, która umożliwi dostosowanie linków w okruszkach. W rezultacie opracowaliśmy nową wersję, aby wdrożyć tę funkcję, o którą prosił użytkownik.

To wydanie ma na celu poprawę doświadczenia użytkownika i rozwiązanie konkretnych próśb zgłoszonych podczas interakcji z zespołem wsparcia. Dziękujemy naszym użytkownikom za cenne uwagi!
Również nasz programista wtyczki WordPress Tooltip powiedział, że to świetny pomysł, aby wspierać dostosowywanie linku do glosariusza w okruszkach, umożliwiając przekierowanie na inną stronę. Dlatego opracowaliśmy wersję 31.2.8 WordPress Tooltips Pro Plus, aby zrealizować ten pomysł dla użytkowników wtyczki WordPress Tooltips.

Jak zamienić link „Glosariusz” w okruszkach nawigacyjnych glosariusza w wtyczce WordPress Tooltips?

Dla istniejących użytkowników: Aby pobrać najnowszą wersję wtyczki WordPress Tooltip Pro Plus, kliknij link zatytułowany „pobierz wordpress tooltip”. Upewnij się, że numer wersji to 31.0.8 lub wyższy. Nowi użytkownicy muszą uzyskać licencję na wtyczkę WordPress Tooltip Pro Plus przed kontynuowaniem.

Dostęp administratora: Zaloguj się na swoją stronę WordPress jako administrator.

Zarządzanie wtyczkami: W panelu nawigacyjnym swojej strony zlokalizuj sekcję „Wtyczki”.

Usuń starą wersję: Dezaktywuj i całkowicie usuń wszystkie wcześniejsze wersje wtyczki WordPress Tooltip z listy wtyczek.

Prześlij nową wersję: Aby zainstalować zaktualizowaną wtyczkę, kliknij przycisk „Dodaj nową” i wybierz plik zip nowej wtyczki WordPress Tooltip.

Aktywuj wtyczkę: Po przesłaniu upewnij się, że aktywujesz wtyczkę z panelu wtyczek, aby uzyskać dostęp do jej funkcji.

Dla nowych użytkowników: Nowi w wtyczce WordPress Tooltip? Sprawdź nasz film instruktażowy dotyczący instalacji: Samouczek wideo WordPress Tooltips 3: Jak przesłać i aktywować wtyczkę WordPress Tooltips Pro.

Dostęp do ustawień: W swoim panelu WordPress przejdź do menu „Tooltips” i kliknij opcję „Ustawienia glosariusza”. Menu powinno wyglądać następująco:

  • tooltips menu in wordpress tooltips pro plus 27.5.8

Dostosuj linki w okruszkach: W panelu ustawień glosariusza, poszukaj opcji oznaczonej jako „Dostosuj link glosariusza w okruszkach nawigacyjnych”. Oto jak to wygląda:


Na dole panelu ustawień znajdziesz rozwijane menu, w którym możesz wybierać spośród różnych stron WordPress. Po prostu wybierz inną stronę, aby zamienić istniejący link kategorii glosariusza w okruszkach.
WaŜna uwaga:
Jeśli wolisz nie zmieniać linku do glosariusza w okruszkach, po prostu wybierz „Brak” z rozwijanego menu.

Jak widać na dole panelu ustawień glosariusza WordPress, dodaliśmy nową opcję o nazwie „Dostosuj link glosariusza w okruszkach nawigacyjnych”. W tej opcji znajduje się pole rozwijane z listą wszystkich stron WordPress. Możesz po prostu wybrać inną stronę z tego rozwijanego menu, aby zamienić link kategorii glosariusza w okruszkach.
Proszę pamiętać:
Jeśli nie chcesz zastępować linku do glosariusza w okruszkach nawigacyjnych, po prostu wybierz element „Brak” w polu rozwijanym.
Naprawdę doceniamy Waszą fantastyczną sugestię! Jeśli macie dodatkowe pomysły na funkcje, nie wahajcie się z nami skontaktować. Jesteśmy podekscytowani, mogąc pomóc w urzeczywistnieniu Waszej wizji!
Życzymy Wam wspaniałego dnia pełnego radości wśród najbliższych!
Z pozdrowieniami,
Zespół wsparcia wtyczki WordPress Tooltip

Tagged with: , , ,

¿Cómo reemplazar el enlace de “Glosario” en las migas de pan del glosario en el plugin de WordPress Tooltips?

Hola, queridos usuarios del plugin WordPress Tooltip, Espero que este mensaje los encuentre bien y disfrutando de un feliz fin de semana con su familia. Recientemente lanzamos la versión 31.0.8 del plugin WordPress Tooltips Pro Plus en respuesta a los comentarios de los usuarios. Un usuario se comunicó inicialmente en busca de ayuda para configurar su página de glosario, expresando dificultades para lograr que se viera como deseaba. Nuestro equipo de soporte los guió con los pasos para crear una nueva página e insertar un shortcode. Después de algunos idas y venidas, el usuario logró configurar su índice de glosario, pero desea reemplazar los enlaces de categoría de glosario en las migas de pan por enlaces a otra página SEO.

Para abordar esto, nuestro equipo de soporte informó al usuario que estamos trabajando en una actualización para permitir la personalización de los enlaces de las migas de pan. Como resultado, desarrollamos la nueva versión para implementar esta función solicitada por el usuario.
Este lanzamiento tiene como objetivo mejorar la experiencia del usuario y resolver las solicitudes específicas planteadas durante la interacción de soporte. ¡Gracias a nuestros usuarios por sus valiosos aportes!

Además, nuestro desarrollador del plugin WordPress Tooltip mencionó que es una gran idea soportar la personalización del enlace de glosario en las migas de pan, permitiendo que dirija a otra página. Así que desarrollamos la versión 31.2.8 de WordPress Tooltips Pro Plus para hacer realidad esta idea para los usuarios de WordPress Tooltip.

¿Cómo reemplazar el enlace de “Glosario” en las migas de pan del glosario en el plugin de WordPress Tooltips?

Para usuarios existentes: Para descargar la última versión del plugin WordPress Tooltip Pro Plus, haga clic en el enlace etiquetado “descargar wordpress tooltip”. Asegúrese de que el número de versión sea 31.0.8 o superior. Los nuevos usuarios deberán obtener una licencia para el plugin WordPress Tooltip Pro Plus antes de continuar.
Acceso de administrador: Inicie sesión en su sitio de WordPress con privilegios de administrador.
Gestión de plugins: En el panel de su sitio, ubique la sección “Plugins”.
Eliminar versión anterior: Desactive y elimine completamente cualquier versión anterior del plugin WordPress Tooltip de la lista de plugins.
Cargar nueva versión: Para instalar el plugin actualizado, haga clic en el botón “Agregar nuevo” y seleccione el archivo zip del nuevo plugin WordPress Tooltip.
Activar el plugin: Después de cargarlo, asegúrese de activar el plugin desde el panel de plugins para acceder a sus características.
Para usuarios por primera vez: ¿Nuevo en el plugin WordPress Tooltip? Consulte nuestro video tutorial sobre instalación: Video tutorial de WordPress Tooltips 3: Cómo cargar y activar el plugin WordPress Tooltips Pro.
Acceder a la configuración: En su panel de WordPress, navegue al menú “Tooltips” y haga clic en la opción “Configuración del glosario”. El menú debería mostrarse de la siguiente manera:

  • tooltips menu in wordpress tooltips pro plus 27.5.8

Menú de tooltips en WordPress Tooltips Pro Plus 27.5.8
Personalizar enlaces de migas de pan: Dentro del panel de configuración del glosario, busque la opción etiquetada “Personalizar enlace de glosario en las migas de pan del glosario”. Aquí hay una vista de cómo aparece:


En la parte inferior del panel de configuración, encontrará un menú desplegable donde puede elegir entre varias páginas de WordPress. Simplemente seleccione una página diferente para reemplazar el enlace de categoría de glosario existente en las migas de pan.
Nota importante:
Si prefiere no cambiar el enlace de glosario en las migas de pan, simplemente seleccione “Ninguno” del menú desplegable.
Menú de tooltips en WordPress Tooltips Pro Plus 27.5.8
Dentro del panel de configuración del glosario de WordPress, encontrará la opción “Personalizar enlace de glosario en las migas de pan del glosario”. Se ve así:


Como puede ver en la parte inferior del panel de configuración del glosario de WordPress, hemos agregado una nueva opción llamada ‘Personalizar enlace de glosario en las migas de pan del glosario’. En esta opción, hay un cuadro desplegable que lista todas las páginas de WordPress. Puede simplemente seleccionar una página diferente de este desplegable para reemplazar el enlace de categoría de glosario en las migas de pan.
Tenga en cuenta:
Si no desea reemplazar el enlace de glosario en las migas de pan, simplemente seleccione el elemento “Ninguno” en el cuadro desplegable.
¡Realmente apreciamos su fantástica sugerencia! Si tiene ideas adicionales sobre funciones, no dude en comunicarse con nosotros. ¡Estamos emocionados de ayudar a hacer realidad su visión!
¡Les deseamos un maravilloso día lleno de alegría junto a sus seres queridos!
Saludos cordiales,
El equipo de soporte del plugin WordPress Tooltip

Tagged with: , , ,

Wie ersetzt man den „Glossar“-Link in den Glossar-Breadcrumbs im WordPress Tooltips Plugin?

Hallo, liebe Benutzer des WordPress Tooltip Plugins, ich hoffe, diese Nachricht erreicht euch wohl und ihr verbringt ein schönes Wochenende mit eurer Familie. Wir haben kürzlich die Version 31.0.8 des WordPress Tooltips Pro Plus Plugins veröffentlicht, als Antwort auf das Feedback der Benutzer. Ein Benutzer hatte sich ursprünglich um Hilfe beim Einrichten seiner Glossarseite gewendet und Schwierigkeiten geäußert, diese wie gewünscht zu gestalten. Unser Support-Team hat ihn mit Schritten zur Erstellung einer neuen Seite und dem Einfügen eines Shortcodes unterstützt. Nach einigem Hin und Her hat der Benutzer erfolgreich sein Glossar-Index eingerichtet, möchte jedoch die Links zu den Glossarkategorien in den Breadcrumbs durch Links zu einer anderen SEO-Seite ersetzen.

Um diesem Anliegen Rechnung zu tragen, informierte unser Support-Team den Benutzer, dass wir an einem Update arbeiten, um die Anpassung von Breadcrumb-Links zu ermöglichen. Infolgedessen haben wir die neue Version entwickelt, um dieses vom Benutzer gewünschte Feature zu implementieren.
Diese Version soll das Benutzererlebnis verbessern und die spezifischen Anfragen während der Support-Interaktion lösen. Vielen Dank an unsere Benutzer für ihr wertvolles Feedback!

Unser Entwickler des WordPress Tooltip Plugins hat außerdem gesagt, dass es eine großartige Idee ist, die Anpassung des Glossar-Links in den Breadcrumbs zu unterstützen, damit er zu einer anderen Seite führt. Daher haben wir die Version 31.2.8 des WordPress Tooltips Pro Plus Plugins entwickelt, um diese Idee für die Benutzer des WordPress Tooltips zu verwirklichen.

Wie ersetzt man den „Glossar“-Link in den Glossar-Breadcrumbs im WordPress Tooltips Plugin?

– Für bestehende Benutzer: Um die neueste Version des WordPress Tooltip Pro Plus Plugins herunterzuladen, klicken Sie auf den Link mit der Bezeichnung „WordPress Tooltip herunterladen“. Stellen Sie sicher, dass die Versionsnummer 31.0.8 oder höher ist. Neue Benutzer müssen eine Lizenz für das WordPress Tooltip Pro Plus Plugin erwerben, bevor sie fortfahren können.
– Admin-Zugang: Melden Sie sich mit Administratorrechten auf Ihrer WordPress-Seite an.
– Plugin-Verwaltung: Suchen Sie im Dashboard Ihrer Seite den Bereich „Plugins“.
– Alte Version entfernen: Deaktivieren und löschen Sie alle vorherigen Versionen des WordPress Tooltip Plugins aus der Plugin-Liste.
– Neue Version hochladen: Um das aktualisierte Plugin zu installieren, klicken Sie auf die Schaltfläche „Neu hinzufügen“ und wählen Sie die ZIP-Datei des neuen WordPress Tooltip Plugins aus.
– Plugin aktivieren: Nach dem Hochladen aktivieren Sie das Plugin über das Plugin-Panel, um auf dessen Funktionen zuzugreifen.
– Für Erstbenutzer: Neu im WordPress Tooltip Plugin? Schauen Sie sich unser Video-Tutorial zur Installation an: WordPress Tooltips Video Tutorial 3: So laden Sie das WordPress Tooltips Pro Plugin hoch und aktivieren es.
– Einstellungen aufrufen: Navigieren Sie in Ihrem WordPress-Dashboard zum Menü „Tooltips“ und klicken Sie auf die Option „Glossar-Einstellungen“. Das Menü sollte folgendermassen angezeigt werden:


  • tooltips menu in wordpress tooltips pro plus 27.5.8

– Breadcrumb-Links anpassen: Im Einstellungsbereich des Glossars suchen Sie die Option mit der Bezeichnung „Glossar-Link in den Glossar-Breadcrumbs anpassen“. So sieht es aus:


Am Ende des Einstellungsbereichs finden Sie ein Dropdown-Menü, in dem Sie aus verschiedenen WordPress-Seiten auswählen können. Wählen Sie einfach eine andere Seite aus, um den bestehenden Glossarkategorielink in den Breadcrumbs zu ersetzen.

– Wichtiger Hinweis: Wenn Sie den Glossar-Link in den Breadcrumbs nicht ändern möchten, wählen Sie einfach „Keine“ aus dem Dropdown-Menü.

Im WordPress-Glossar-Einstellungsbereich finden Sie die Option „Glossar-Link in den Glossar-Breadcrumbs anpassen“, sie sieht so aus:
Wie Sie am Ende des WordPress-Glossar-Einstellungsbereichs sehen können, haben wir eine neue Option mit dem Namen „Glossar-Link in den Glossar-Breadcrumbs anpassen“ hinzugefügt. In dieser Option gibt es ein Dropdown-Feld, das alle WordPress-Seiten auflistet. Sie können einfach eine andere Seite aus diesem Dropdown auswählen, um den Glossarkategorielink in den Breadcrumbs zu ersetzen.
Bitte beachten Sie:

Wenn Sie den Glossar-Link in den Glossar-Breadcrumbs nicht ersetzen möchten, wählen Sie einfach den Eintrag „Keine“ im Dropdown-Feld aus.
Wir schätzen Ihren fantastischen Vorschlag! Sollten Sie weitere Ideen für Funktionen haben, zögern Sie bitte nicht, uns zu kontaktieren. Wir freuen uns darauf, Ihre Vision Wirklichkeit werden zu lassen!
Wir wünschen Ihnen einen wunderbaren Tag voller Freude mit Ihren Lieben!
Herzliche Grüße,
Das Support-Team des WordPress Tooltip Plugins

Tagged with: , , ,

How to Replace the “Glossary” Link in the Glossary Breadcrumbs in the WordPress Tooltips Plugin? WordPress Tooltips Pro Plus version 31.2.8 has been released

Hi, dear  WordPress Tooltip plugin users,I hope this message find you are doing well and having happy weekend with your family.   We recently released version 31.0.8 of the WordPress Tooltips Pro Plus plugin in response to user feedback.  A user initially reached out for help with setting up their glossary page, expressing difficulty in getting it to look as desired. Our support team guided them with steps to create a new page and insert a shortcode. After some back and forth, the user successfully set up their glossary index, but they want to replace the glossary category links in the breadcrumb with links to another SEO page.

To address this, our support team informed the user that we are working on an update to allow customization of breadcrumb links. As a result, we developed the new version to implement this feature requested by the user.

This release aims to enhance user experience and resolve the specific requests made during the support interaction. Thank you to our users for their valuable input!

Also, our WordPress tooltip plugin developer said that it’s a great idea to support customizing the glossary link in the breadcrumb, allowing it to lead to another page. So we developed WordPress Tooltips Pro Plus version 31.2.8 to bring the idea to life for wordpress tooltip users. 🙂

How to Replace the “Glossary” Link in the Glossary Breadcrumbs in the WordPress Tooltips Plugin?

  • For Existing Users: To download the latest version of the WordPress Tooltip Pro Plus plugin, click the link labeled “download wordpress tooltip” Ensure that the version number is 31.0.8 or higher. New users will need to obtain a license for WordPress Tooltip Pro Plus plugin before proceeding.
  • Admin Access: Log into your WordPress site with administrator privileges.
  • Plugin Management: In your site’s dashboard, locate the “Plugins” section.
  • Remove Old Version: Deactivate and completely delete any previous versions of the WordPress Tooltip plugin from the plugins list.
  • Upload New Version: To install the updated plugin, click the “Add New” button and select the zip file of the new WordPress Tooltip plugin.
  • Activate the Plugin: After uploading, ensure you activate the plugin from the plugins panel to access its features.
  • For First-Time Users: New to the WordPress Tooltip plugin? Check out our video tutorial on installation: WordPress Tooltips Video Tutorial 3: How to Upload and Activate WordPress Tooltips Pro Plugin.
  • Access Settings: In your WordPress dashboard, navigate to the “Tooltips” menu and click on the “Glossary Settings” option. The menu should display as follows:
  • tooltips menu in wordpress tooltips pro plus 27.5.8
  • Customize Breadcrumb Links: Within the glossary settings panel, look for the option labeled “Customize Glossary Link in Glossary Breadcrumbs.” Here’s how it appears:

    At the bottom of the settings panel, you will find a dropdown menu where you can choose from various WordPress pages. Simply select a different page to replace the existing glossary category link in the breadcrumbs.

  • Important Note:
    If you prefer not to change the glossary link in the breadcrumbs, simply select “None” from the dropdown menu.


tooltips menu in wordpress tooltips pro plus 27.5.8

9: Within the WordPress glossary settings panel, you will find the “Customize Glossary Link in Glossary Bread Crumbs” option, it looks like this:

As you can see at the bottom of the WordPress Glossary Settings panel, we have added a new option called ‘Customize Glossary Link in Glossary Bread Crumbs’ In this option, there is a dropdown box listing all WordPress pages. You can simply select a different page from this dropdown to replace the glossary category link in the breadcrumbs.

Please note:

If you do not want to replace the glossary link in Glossary Bread Crumbs, simply select the item “None” in the dropdown box

We truly appreciate your fantastic suggestion! Should you have any additional feature ideas, please feel free to reach out to us. We’re excited to assist in bringing your vision to life!

Wishing you a wonderful day filled with joy alongside your loved ones!

Warm regards,
The Support Team at WordPress Tooltip Plugin

Tagged with: , , ,

Come cambiare il colore in cui i link appaiono sullo sfondo della casella tooltip di WordPress per una migliore visibilità?

Ciao cari utenti del plugin WordPress Tooltip! Speriamo che questo messaggio vi trovi bene e che abbiate una giornata felice. Un utente del tooltip di WordPress ha inviato un ticket, chiedendo: Vorrei cambiare il colore in cui i link appaiono (attualmente nero) rispetto allo sfondo della casella tooltip di WordPress (attualmente grigio scuro) per una migliore visibilità. Un esempio può essere trovato sul mio sito demo.com – nella pagina principale, cercando il termine “fonti indipendenti”. I nostri sviluppatori del plugin WordPress Tooltips hanno controllato la pagina e si sono resi conto che avevamo implementato questa richiesta di funzionalità nella versione 14.9.2 del plugin WordPress Tooltip qualche anno fa.

  1. Accedi al tuo account sul sito del plugin WordPress Tooltip.
  2. Clicca sulla voce di menu “Download” per ottenere il plugin pro o pro plus del tooltip di WordPress.
  3. Accedi al tuo pannello di amministrazione di WordPress.
  4. Seleziona “Plugin” dal menu di amministrazione di WordPress, disattiva la versione precedente del plugin WordPress Tooltip e rimuovi il vecchio plugin.
  5. Nel menu “Plugin”, clicca su “Aggiungi nuovo” nella parte superiore del pannello. Carica il file ZIP del plugin tooltip che hai scaricato dal sito del glossario tooltip di WordPress. Attiva l’ultima versione del plugin WordPress Tooltip.
  6. Clicca sulla voce di menu “Tooltips” e seleziona il sottomenu “Stile Tooltip” per aprire il pannello “Impostazioni Stile Tooltip”, che dovrebbe apparire così:
  7. Tooltips Style Panel in wordpress tooltips pro plus 28.2.8
  8. Pannello Stile Tooltip in WordPress Tooltips Pro Plus 28.2.8
  9. Nella parte inferiore del pannello “Impostazioni Stile Tooltip”, troverai l’opzione “Colore dei link nella casella tooltip”. Puoi personalizzare il colore del link usando il selettore di colore. Clicca semplicemente sul selettore di colore per scegliere il colore del link desiderato. Se decidi di non personalizzare il colore del link, puoi rimuoverlo nella finestra pop-up del selettore di colore.
  10. Non dimenticare di cliccare sul pulsante blu “Salva modifiche” per applicare le tue modifiche. Sul frontend, quando passi il mouse su un termine tooltip, vedrai che i colori dei link nella casella a comparsa tooltip sono stati aggiornati. Ci sono delle dimostrazioni con screenshot, puoi vedere che abbiamo creato un link nella parola “test” nella casella tooltip:

change color of links for tooltip content in the tooltip box

Cambia colore dei link per il contenuto del tooltip nella casella tooltip Puoi vedere che per impostazione predefinita il colore del link è deciso dal tuo tema — è verde, ma dopo le modifiche il colore del link è cambiato in rosso.


Inoltre, puoi personalizzare i colori di sfondo del tooltip con un semplice clic:

Per favore, vai al pannello “Impostazioni di personalizzazione della casella Tooltip”, puoi personalizzare i colori qui, ad esempio: Sfondo della Casella Tooltip di WordPress (campo obbligatorio) Puoi cambiare facilmente lo sfondo della casella a comparsa del tooltip di WordPress utilizzando il selettore di colore.

Wordpress Tooltip Box Background

E poi procedi ad esprimere la tua creatività per personalizzare i tuoi tooltip, rendendoli davvero brillanti. Sentiti libero di esplorare il menu e apportare modifiche che si adattino all’estetica e alle esigenze del tuo sito.

Inoltre, aggiungi diversi colori di sfondo per ogni termine tooltip in un post di WordPress:

Per personalizzare le impostazioni del tuo tooltip, inizia accedendo al tuo sito WordPress e navigando nel menu Tooltips. Successivamente, aggiungi un nuovo termine tooltip o modifica uno esistente per accedere all’editor dei tooltip di WordPress. Nella parte inferiore dell’editor dei contenuti, scoprirai il pannello delle impostazioni di personalizzazione della casella tooltip. Appare come mostrato di seguito:

Tooltip Term Background in Post in tooltips pro plus 18.1.8

Sfondo del Termini Tooltip nel Post in Tooltips Pro Plus 18.1.8 Come evidenziato nell’immagine, il pannello delle impostazioni di personalizzazione della casella tooltip ora include una nuova opzione: “Sfondo del Termine Tooltip nel Post”. Qui troverai un selettore di colore insieme a una casella di selezione etichettata “Disabilita l’Opzione”. Se desideri aggiungere un colore di sfondo al tuo termine tooltip di WordPress, seleziona “Abilita l’Opzione” e scegli il colore preferito usando il selettore di colore. Sopra questo pannello di personalizzazione, c’è un’altra sezione intitolata “Stile Unico Personalizzato per Questo Tooltip.” Assicurati di selezionare “Sì, personalizzerò uno stile unico per questo tooltip.” Una volta che hai inserito il titolo e il contenuto per il tuo tooltip nell’editor, pubblicalo. Poi, inserisci la parola chiave del tooltip in qualsiasi post di WordPress. Quando visualizzi il frontend, vedrai che il colore di sfondo del termine tooltip è cambiato in base alle tue impostazioni nell’editor. Ripeti questo processo per creare sfondi bellissimi per ulteriori parole chiave del tooltip di WordPress, trasformando i tuoi post in contenuti vibranti e coinvolgenti che incoraggiano gli utenti a rimanere sulla tua pagina più a lungo.

Grazie, ti auguro una giornata benedetta con la tua famiglia. Cordiali saluti,
Supporto del Plugin WordPress Tooltip

Tagged with: ,

Comment changer la couleur des liens affichés sur le fond de la boîte d’info-bulle WordPress Tooltip pour une meilleure visibilité ?

Bonjour chers utilisateurs du plugin d’info-bulles WordPress tooltip, j’espère que ce message vous trouve en forme et que vous passez une bonne journée. Un utilisateur du plugin d’info-bulles WordPress a soumis un ticket dans lequel il a demandé :

J’aimerais changer la couleur des liens (actuellement noire) sur le fond de la boîte d’info-bulle WordPress (actuellement gris foncé) pour une meilleure visibilité. Un exemple peut être trouvé sur mon site demo.com – sur la page d’accueil, le terme de recherche « sources indépendantes ».

Nos développeurs du plugin d’info-bulles WordPress ont consulté la page et ont réalisé que nous avions mis en œuvre cette demande de fonctionnalité dans la version 14.9.2 du plugin d’info-bulles WordPress il y a quelques années.

## Comment modifier les couleurs des liens pour le contenu de l’info-bulle dans la boîte d’info-bulle

1. Connectez-vous à votre compte sur le site du plugin d’info-bulles WordPress.
2. Cliquez sur l’élément de menu « Télécharger » pour obtenir le plugin WordPress Tooltip Pro ou le plugin WordPress Tooltips Pro Plus.
3. Accédez à votre panneau d’administration WordPress.
4. Sélectionnez « Plugins » dans le menu d’administration WordPress, désactivez la version précédente du plugin d’info-bulles WordPress et supprimez l’ancien plugin d’info-bulles WordPress.
5. Dans le menu « Plugins », cliquez sur « Ajouter Nouveau » en haut du panneau. Téléchargez le fichier ZIP du plugin d’info-bulles que vous avez téléchargé depuis le site du glossaire des info-bulles WordPress. Activez la dernière version du plugin d’info-bulles WordPress.
6. Cliquez sur l’élément de menu « Info-bulles » et sélectionnez le sous-menu « Style d’info-bulles » pour ouvrir le panneau « Paramètres de style d’info-bulles », qui devrait ressembler à ceci :

Tooltips Style Panel in wordpress tooltips pro plus 28.2.8
Panneau de style d’info-bulles dans WordPress Tooltips Pro Plus 28.2.8
7. En bas du panneau « Paramètres de style d’info-bulles », vous trouverez l’option « Couleur des liens dans la boîte d’info-bulle ». Vous pouvez personnaliser la couleur des liens à l’aide du sélecteur de couleurs. Cliquez simplement sur le sélecteur de couleurs pour choisir la couleur de lien souhaitée. Si vous décidez de ne pas personnaliser la couleur du lien, vous pouvez la supprimer dans la fenêtre contextuelle du sélecteur de couleurs.
8. N’oubliez pas de cliquer sur le bouton bleu « Enregistrer les modifications » pour appliquer vos modifications.
De l’autre côté, lorsque vous passez la souris sur un terme d’info-bulle, vous verrez que les couleurs des liens dans la boîte contextuelle d’info-bulle ont été mises à jour.
Il y a une démonstration par capture d’écran, vous pouvez voir que nous avons créé un lien dans le mot « test » dans la boîte d’info-bulle :


change color of links for tooltip content in the tooltip box

Changer la couleur des liens pour le contenu de l’info-bulle dans la boîte d’info-bulle
Vous pouvez voir que par défaut, la couleur des liens est déterminée par votre thème — elle est verte, mais après modification, la couleur du lien est devenue rouge. De plus, vous pouvez personnaliser les couleurs de fond des info-bulles d’un simple clic :
Veuillez aller au panneau « Paramètres de personnalisation de la boîte d’info-bulle », vous pouvez personnaliser les couleurs ici, par exemple :
Fond de la boîte d’info-bulle WordPress (champ requis)
Vous pouvez facilement changer le fond de la boîte contextuelle d’info-bulle WordPress à l’aide du sélecteur de couleurs d’info-bulles WordPress.

Wordpress Tooltip Box Background

Et ensuite, n’hésitez pas à libérer votre créativité pour personnaliser vos info-bulles, les rendant vraiment brillantes. N’hésitez pas à explorer le menu et à faire des ajustements qui conviennent à l’esthétique et aux besoins de votre site web.

### Ajouter différentes couleurs de fond pour chaque terme d’info-bulle WordPress dans un post WordPress :

Pour personnaliser vos paramètres d’info-bulle, commencez par vous connecter à votre site WordPress et accédez au menu des info-bulles. Ensuite, ajoutez un nouveau terme d’info-bulle ou modifiez-en un existant pour accéder à l’éditeur d’info-bulles WordPress. En bas de l’éditeur de contenu, vous découvrirez le panneau de personnalisation de la boîte d’info-bulle. Il apparaît comme suit :

Tooltip Term Background in Post in tooltips pro plus 18.1.8

Fond du terme d’info-bulle dans le post dans Tooltips Pro Plus 18.1.8
Comme le montre l’image, le panneau de personnalisation de la boîte d’info-bulle inclut désormais une nouvelle option : « Fond de terme d’info-bulle dans le post ». Ici, vous trouverez un sélecteur de couleurs ainsi qu’une case à cocher intitulée « Désactiver l’option ». Si vous souhaitez ajouter une couleur de fond à votre terme d’info-bulle WordPress, sélectionnez « Activer l’option » et choisissez votre couleur préférée à l’aide du sélecteur de couleurs.
Au-dessus de ce panneau de personnalisation, il y a une autre section intitulée « Style unique personnalisé pour cette info-bulle ». Assurez-vous de sélectionner « Oui, je vais personnaliser un style unique pour cette info-bulle ».
Une fois que vous avez saisi le titre et le contenu de votre info-bulle dans l’éditeur, publiez-le. Ensuite, insérez le mot-clé d’info-bulle dans n’importe quel post WordPress. Lorsque vous consultez le front-end, vous verrez que la couleur de fond du terme d’info-bulle a changé en fonction de vos paramètres dans l’éditeur.
Répétez ce processus pour créer de beaux fonds pour d’autres mots-clés d’info-bulles WordPress, transformant vos articles en contenu vivant et engageant qui encourage les utilisateurs à passer plus de temps sur votre page.

Achetez maintenant
Merci, passez une journée bénie avec votre famille.
Cordialement,
Support du plugin d’info-bulles WordPress

Tagged with: ,

WordPress Tooltips Pro Plus 31.1.8 has been released, It resolves conflicts between the member directory and the ‘Don’t load tooltip style and script for this page too’ option

Happy New Year! Dear WordPress Tooltip plugin users Hope this message find you are doing well and having happy new year holiday with your family Our wordpress tooltip developer developed a new wordpress tooltip pro plus plugin to resolves conflicts between the wordpress member directory and the ‘Don’t load tooltip style and script for this page too’ option 🙂

An amazing wordpress tooltips plugin user wrote to use:

Hello,

I like the pro plus version of tooltips. However, I am running into an issue.

I am getting an error in the browser console, this occurs when I disabled the script loading on an individual post, is this intentional? If not, do you have a fix for this?

Thank you

Our wordpress tooltip plugin developer checked the ticket, and we found yes, in wordpress editor, we added an metabox “Don’t load tooltip style and script for this page too”, it looks like this:

Disable specific tooltips

By checking the “Don’t load tooltip style and script for this page too” option within this meta box, tooltips will not be automatically loaded in that specific post. This option can improve your page load speed 🙂

We have recently added too many new modules in wordpress tooltips pro plus plugin, once of them is wordpress member directory module, and it conflicts with “Don’t load tooltip style and script for this page too” option, in wordpress tooltips plugin 31.1.8 we have fixed this problem 🙂

What is member directory?

Member directory is a list of members in your site, along with user name, user description, contact information…etc

How to build a member directory quickly?

1: click download wordpress tooltip to download latest version of wordpress tooltip lugin

2: upload the wordpress tooltip zip file into your wordpress site via wordpress plugins panel

3: activate wordpress tooltip plugin and click Tooltips menu item in wordpress dashboard

4: click member directory sub menu item, it looks like this:

member directory global settings in wordpress tooltip plugin

member directory global settings in wordpress tooltip plugin

5: As you can see, you will open member directory global settings panel, in which you can enable member directory or disable functions of member directory, also you can decide which user roles will be added into the member directory list, for example, you can just add authors into member directory to build a wordpress authro wall for your site, or you can just add teachers directory of your LMS system for your students…etc

6: In front-end, you can just insert the shortcode “member_directory” in any wordpress post, then you will find member directory which looks like this:

member directory orange style via wordpress tooltip

member directory orange style via wordpress tooltip

As you can see, users can click the  letter on the Navigation bar to open the list of users starting with that letter.

In the left column of the directory, we display the user name, in the right column of the member directory, we display user information and details of the user information, the user information is come from the biographical info field in wordpress user profile panel, it looks like this:

user profile of wordpress tooltip user

user profile of wordpress tooltip user

Once user change their information in wordpress user profile, wordpress tooltip will display the new user information in member directory too

In next version, we will add more options to help wordpress tooltip admin decide which user fields should be displayed in member directory

7: You can easily to custom the style from the wordpress glossary settings panel, the glossary settings panel looks like this:

glossary custom panel in wordpress glossary 16.0.8

glossary custom panel in wordpress glossary 16.0.8

As you can see, you can customize member-directory font background, border color, navigation, search form…etc in here, we believe we can re-use the same settings with glossary section, if we need dedicated settings for member-directory, we will build new panel for member-directory in the future

8: A faster method to change style for member directory is use our built-in template, for example, one click to change from orange template to  gray template, then it looks like this:

member directory gray template in wordpress tooltip

member directory gray template in wordpress tooltip

Thanks for the bug report, we have added a license for the wordpress life quote plugin to your account for a sincere thank you 🙂

WordPress Life Quotes Plugin is a lovely plugin to display random life quote on the bottom of wordpress post, life quote can serve as a source of inspiration and motivation for readers, including a random life quote in a wordperss post can help to break up the text and make the content more visually interesting and engaging and creating a connection with readers.

After activate the WordPress Life Quotes Plugin, at the end of the content of wordpress post , readers will find a lovely random life quote, everytime when user read your wordpress post, they will find different lovely life quote

Thanks, have a blessed day with your family 🙂

Best Regards,

WordPress tooltips plugin support

Tagged with: , ,
Top