Tag: wordpress glossary plugin

Wie ersetzt man den „Glossar“-Link in den Glossar-Breadcrumbs im WordPress Tooltips Plugin?

Hallo, liebe Benutzer des WordPress Tooltip Plugins, ich hoffe, diese Nachricht erreicht euch wohl und ihr verbringt ein schönes Wochenende mit eurer Familie. Wir haben kürzlich die Version 31.0.8 des WordPress Tooltips Pro Plus Plugins veröffentlicht, als Antwort auf das Feedback der Benutzer. Ein Benutzer hatte sich ursprünglich um Hilfe beim Einrichten seiner Glossarseite gewendet und Schwierigkeiten geäußert, diese wie gewünscht zu gestalten. Unser Support-Team hat ihn mit Schritten zur Erstellung einer neuen Seite und dem Einfügen eines Shortcodes unterstützt. Nach einigem Hin und Her hat der Benutzer erfolgreich sein Glossar-Index eingerichtet, möchte jedoch die Links zu den Glossarkategorien in den Breadcrumbs durch Links zu einer anderen SEO-Seite ersetzen.

Um diesem Anliegen Rechnung zu tragen, informierte unser Support-Team den Benutzer, dass wir an einem Update arbeiten, um die Anpassung von Breadcrumb-Links zu ermöglichen. Infolgedessen haben wir die neue Version entwickelt, um dieses vom Benutzer gewünschte Feature zu implementieren.
Diese Version soll das Benutzererlebnis verbessern und die spezifischen Anfragen während der Support-Interaktion lösen. Vielen Dank an unsere Benutzer für ihr wertvolles Feedback!

Unser Entwickler des WordPress Tooltip Plugins hat außerdem gesagt, dass es eine großartige Idee ist, die Anpassung des Glossar-Links in den Breadcrumbs zu unterstützen, damit er zu einer anderen Seite führt. Daher haben wir die Version 31.2.8 des WordPress Tooltips Pro Plus Plugins entwickelt, um diese Idee für die Benutzer des WordPress Tooltips zu verwirklichen.

Wie ersetzt man den „Glossar“-Link in den Glossar-Breadcrumbs im WordPress Tooltips Plugin?

– Für bestehende Benutzer: Um die neueste Version des WordPress Tooltip Pro Plus Plugins herunterzuladen, klicken Sie auf den Link mit der Bezeichnung „WordPress Tooltip herunterladen“. Stellen Sie sicher, dass die Versionsnummer 31.0.8 oder höher ist. Neue Benutzer müssen eine Lizenz für das WordPress Tooltip Pro Plus Plugin erwerben, bevor sie fortfahren können.
– Admin-Zugang: Melden Sie sich mit Administratorrechten auf Ihrer WordPress-Seite an.
– Plugin-Verwaltung: Suchen Sie im Dashboard Ihrer Seite den Bereich „Plugins“.
– Alte Version entfernen: Deaktivieren und löschen Sie alle vorherigen Versionen des WordPress Tooltip Plugins aus der Plugin-Liste.
– Neue Version hochladen: Um das aktualisierte Plugin zu installieren, klicken Sie auf die Schaltfläche „Neu hinzufügen“ und wählen Sie die ZIP-Datei des neuen WordPress Tooltip Plugins aus.
– Plugin aktivieren: Nach dem Hochladen aktivieren Sie das Plugin über das Plugin-Panel, um auf dessen Funktionen zuzugreifen.
– Für Erstbenutzer: Neu im WordPress Tooltip Plugin? Schauen Sie sich unser Video-Tutorial zur Installation an: WordPress Tooltips Video Tutorial 3: So laden Sie das WordPress Tooltips Pro Plugin hoch und aktivieren es.
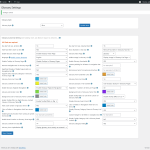
– Einstellungen aufrufen: Navigieren Sie in Ihrem WordPress-Dashboard zum Menü „Tooltips“ und klicken Sie auf die Option „Glossar-Einstellungen“. Das Menü sollte folgendermassen angezeigt werden:


  • tooltips menu in wordpress tooltips pro plus 27.5.8

– Breadcrumb-Links anpassen: Im Einstellungsbereich des Glossars suchen Sie die Option mit der Bezeichnung „Glossar-Link in den Glossar-Breadcrumbs anpassen“. So sieht es aus:


Am Ende des Einstellungsbereichs finden Sie ein Dropdown-Menü, in dem Sie aus verschiedenen WordPress-Seiten auswählen können. Wählen Sie einfach eine andere Seite aus, um den bestehenden Glossarkategorielink in den Breadcrumbs zu ersetzen.

– Wichtiger Hinweis: Wenn Sie den Glossar-Link in den Breadcrumbs nicht ändern möchten, wählen Sie einfach „Keine“ aus dem Dropdown-Menü.

Im WordPress-Glossar-Einstellungsbereich finden Sie die Option „Glossar-Link in den Glossar-Breadcrumbs anpassen“, sie sieht so aus:
Wie Sie am Ende des WordPress-Glossar-Einstellungsbereichs sehen können, haben wir eine neue Option mit dem Namen „Glossar-Link in den Glossar-Breadcrumbs anpassen“ hinzugefügt. In dieser Option gibt es ein Dropdown-Feld, das alle WordPress-Seiten auflistet. Sie können einfach eine andere Seite aus diesem Dropdown auswählen, um den Glossarkategorielink in den Breadcrumbs zu ersetzen.
Bitte beachten Sie:

Wenn Sie den Glossar-Link in den Glossar-Breadcrumbs nicht ersetzen möchten, wählen Sie einfach den Eintrag „Keine“ im Dropdown-Feld aus.
Wir schätzen Ihren fantastischen Vorschlag! Sollten Sie weitere Ideen für Funktionen haben, zögern Sie bitte nicht, uns zu kontaktieren. Wir freuen uns darauf, Ihre Vision Wirklichkeit werden zu lassen!
Wir wünschen Ihnen einen wunderbaren Tag voller Freude mit Ihren Lieben!
Herzliche Grüße,
Das Support-Team des WordPress Tooltip Plugins

Tagged with: , , ,

How to Replace the “Glossary” Link in the Glossary Breadcrumbs in the WordPress Tooltips Plugin? WordPress Tooltips Pro Plus version 31.2.8 has been released

Hi, dear  WordPress Tooltip plugin users,I hope this message find you are doing well and having happy weekend with your family.   We recently released version 31.0.8 of the WordPress Tooltips Pro Plus plugin in response to user feedback.  A user initially reached out for help with setting up their glossary page, expressing difficulty in getting it to look as desired. Our support team guided them with steps to create a new page and insert a shortcode. After some back and forth, the user successfully set up their glossary index, but they want to replace the glossary category links in the breadcrumb with links to another SEO page.

To address this, our support team informed the user that we are working on an update to allow customization of breadcrumb links. As a result, we developed the new version to implement this feature requested by the user.

This release aims to enhance user experience and resolve the specific requests made during the support interaction. Thank you to our users for their valuable input!

Also, our WordPress tooltip plugin developer said that it’s a great idea to support customizing the glossary link in the breadcrumb, allowing it to lead to another page. So we developed WordPress Tooltips Pro Plus version 31.2.8 to bring the idea to life for wordpress tooltip users. 🙂

How to Replace the “Glossary” Link in the Glossary Breadcrumbs in the WordPress Tooltips Plugin?

  • For Existing Users: To download the latest version of the WordPress Tooltip Pro Plus plugin, click the link labeled “download wordpress tooltip” Ensure that the version number is 31.0.8 or higher. New users will need to obtain a license for WordPress Tooltip Pro Plus plugin before proceeding.
  • Admin Access: Log into your WordPress site with administrator privileges.
  • Plugin Management: In your site’s dashboard, locate the “Plugins” section.
  • Remove Old Version: Deactivate and completely delete any previous versions of the WordPress Tooltip plugin from the plugins list.
  • Upload New Version: To install the updated plugin, click the “Add New” button and select the zip file of the new WordPress Tooltip plugin.
  • Activate the Plugin: After uploading, ensure you activate the plugin from the plugins panel to access its features.
  • For First-Time Users: New to the WordPress Tooltip plugin? Check out our video tutorial on installation: WordPress Tooltips Video Tutorial 3: How to Upload and Activate WordPress Tooltips Pro Plugin.
  • Access Settings: In your WordPress dashboard, navigate to the “Tooltips” menu and click on the “Glossary Settings” option. The menu should display as follows:
  • tooltips menu in wordpress tooltips pro plus 27.5.8
  • Customize Breadcrumb Links: Within the glossary settings panel, look for the option labeled “Customize Glossary Link in Glossary Breadcrumbs.” Here’s how it appears:

    At the bottom of the settings panel, you will find a dropdown menu where you can choose from various WordPress pages. Simply select a different page to replace the existing glossary category link in the breadcrumbs.

  • Important Note:
    If you prefer not to change the glossary link in the breadcrumbs, simply select “None” from the dropdown menu.


tooltips menu in wordpress tooltips pro plus 27.5.8

9: Within the WordPress glossary settings panel, you will find the “Customize Glossary Link in Glossary Bread Crumbs” option, it looks like this:

As you can see at the bottom of the WordPress Glossary Settings panel, we have added a new option called ‘Customize Glossary Link in Glossary Bread Crumbs’ In this option, there is a dropdown box listing all WordPress pages. You can simply select a different page from this dropdown to replace the glossary category link in the breadcrumbs.

Please note:

If you do not want to replace the glossary link in Glossary Bread Crumbs, simply select the item “None” in the dropdown box

We truly appreciate your fantastic suggestion! Should you have any additional feature ideas, please feel free to reach out to us. We’re excited to assist in bringing your vision to life!

Wishing you a wonderful day filled with joy alongside your loved ones!

Warm regards,
The Support Team at WordPress Tooltip Plugin

Tagged with: , , ,

How to Replace the Glossary Category Link in the Glossary Breadcrumbs in the WordPress Tooltips Plugin? WordPress Tooltips Pro Plus version 31.0.8 has been released

Hi, dear users of  WordPress Tooltip plugin,I truly wish that this message reaches you in high spirits, surrounded by the joy and comfort of your dear family. 🙂 We just released the version 31.0.8 of wordpress tooltips pro plus, the reason for developing this version is that a few days before, we received a few support tickets from an amazing wordpress tooltip user:


Subject:
Help with the setup

Message:
Hello dear support team, I can’t quite  get to grips with the operation. I would like it to look
like this page (https://demo/lexikon). It looks like  this for me: (https://demo/lexiko
n) The pictures are not displayed and it doesn’t look nice. Can you help me?

Thank you
Regards


Our wordpress tooltip support replied:

Hi,
Hope this message find you are doing well and having happy weekend with
your family 🙂

Sir, it is greate to know you are SEO expert! 🙂

Sir, let’s solve the problem step by step:
1: Would you please create a new page in wordpress dashboard
2: In this new page, please insert glossary shortcode: [ glossary ]
3: Then in front end, the glossary page looks like this: https ://tooltips.org/glossary-demo/  🙂

Sir, we checked pages, the page https ://demo/lexikon is glossary index page which display all
glossary terms(with links) in one  page to improve SEO rank, it is a wordpress standard category archive page, in this page, we found your theme mentioned you need check theme panel and enable some functions in block…etc,  this page is designed by wordpress theme, so please just follow the top to check your theme  panel and enable image in backend, I
guess then you will find images display in this archive page 🙂

If you have any more question, please don’t hesitate to tell us, we are very happy to help you solve the problem asap we can

Thanks, have a blessed weekend with your loved ones 🙂
Best Regards,
Wordpress Tooltips Plugin Support ——————————————————————————————————–

The user replied:

Hello Support Team,
Thank you very much for your help! I have created a new page and inserted
the shortcode [ glossary ]  “https://demo/lexikon-glossary”. Now it looks exactly like  your glossary demo page. After I set the “Glossary Index Page:” in the “Glossary Settings”, I had  the archive page again. If I simply selected another page, the links were not correct. Unfortunately I can’t get to grips with the many functions, is it  possible that you can set this correctly for me? I would like to have it just like on your site:  https://tooltips.org/glossary-demo/
Many thanks and have a good start to the week.
Greetings
———————————————————————————————————–

Our wordpress tooltip plugin support team replied:

Hi,
Thanks for the reply 🙂

It is great to know you have created new page and insert the shortcode and it works well 🙂

Sorry for heard issues of

#1: After I set the “Glossary Index Page:” in the “Glossary Settings”, I had the archive page again.

#2: If I simply selected another page, the links were not correct. We ensure 100% we can solve  the problem for you 🙂

Sir, would you please give us a screenshot of glossary settings page, If you are using Firefox, you can find the screenshot tool by going to “More Tools” –“Customize  Firefox” and then you
can easily take screenshots:)

Also would you please tell us the page URLs in:
#1: After I set the “Glossary Index Page:” in the”Glossary Settings”, I had the archive page  again.

and #2: If I simply selected another page, the links were not correct.

So we can understand it better and help you solve the problem 🙂

Please note, in general, when you set up the option “glossary index page”, please do not select  the page https://demo/lexikon-glossary , because https://demo/lexikon-glossary is a glossary table page which created by the shortcode [ glossary ], and glossary index page is a category  archive page, you can use select another page in the option “glossary index page” 🙂

Thanks, have a blessed day with your loved ones 🙂

Best Regards,
Support

———————————————————————————————————–

And we checked settings for the amazing tooltip user, we reported to the user:

Hi,

Hope you are doing well and having happy days with your family 🙂

Sir, we have resolved the problem for you 🙂

We found you have two page  which inserted the the shortcode [ glossary ]:
1: Glossary & Lexikon the URL is: http://127.0.0.1/glossary-lexikon

2: Lexikon/Glossary http://127.0.0.1/lexikon-glossary

And you set up one of them as glossary index in glossary settings panel 🙂

Okay, A simple & fast way to resolve the problem is:
1 login wordpress

2 in wordpress dashbpoard, click wordpress “pages” menu item

3 please click “add new page” to create a new page, please just enter something like: “glossary index” as page title, you do not need to enter any content in the page, then just publish the
page 🙂

4 in wordpress dashboard, please click “tooltips” menu item, then click “Glossary Settings” sub-menu item

5 you will open Glossary Settings panel, in the option “Glossary Index Page”, please select the  new page “glossary index”, then click “save changes” in Glossary Settings panel

6 now when you open the page http://127.0.0.1/glossary-index, you will find the page is a glossary index page that like our glossary index page demo: https://tooltips.org/glossary/

7 then when you open http://127.0.0.1/lexikon-glossary or http://127.0.0.1/glossary-lexikon,
You will find it is a glossary page that that like our glossary page demo: https://tooltips.org/glossary-demo/

Would you please follow our guide to do a test? Any more question is welcome 🙂

Sorry for the delayed response again, our developer have added a wordpress FAQ pro plugin license in your account as a Sorry,  WordPress FAQ plugin is a powerful & fast jQuery FAQ
solution to help wordpress blodder create / manage / edit FAQs easily, select default pretty FAQ template and custom FAQ style in back-end via a few clicks. With wordpress faq plugin, it is very easy to create and show accordion FAQs, display FAQs grouped by category…etc, easy to use, select pretty FAQ templates from pre-designed template, custom FAQ style in
back-end via a few clicks, Support use OpenAI ChatGPT to generate high-quality content for WordPress F.A.Q and wordpress post automatically, support WooCommerce Product FAQ, Responsive FAQ, Multiple FAQ Templates, FAQs grouped by category, specified number of  FAQ items for each FAQ… and more and more, you can find more details at:

WordPress FAQ Pro Plugin With WordPress Tooltips (version 4.6.6)

Thanks, have a blessed day with your loved ones 🙂

Best Regards,
Support Team


Am 28.06.2024 um 21:38 schrieb
happysupport:

Hi ,

Hope you are doing well and having happy days with your family 🙂

Thanks for the message 🙂

We are very happy to help you 🙂

I am assign our developer to check it, we will reply you again 🙂

Thanks, have a blessed day with your family 🙂

Best Regards,
Wordpress Tooltips Plugin Support Team


Then the wordpress tooltip user replied:

Hi Support Team,

thank you very much for your commitment and efforts. It worked. I still have one small point.
When I click on Lexicon, I get to the following page: https://demo/lexikon-glossary That is also OK. If I now click on the first post: https://demo/glossary/302-weiterleitung Also OK.
In the post comes:

Home / Glossary Index Page / 302 Forwarding with the link (Glossary Index Page): https://demo/glossary

And this page should not be displayed, I would like to have the index again:
https://demo/lexikon-glossary

Is that possible?

Best Regards,
—————————————————————————————————————–

Then our wordpress tooltip support replied:

Hi,

Thanks for the reply 🙂

It is great to know it works 🙂

Thanks for the new report, our developer checked your page and checked our code, in the current time:

1: in glossary settings panel, we have option “enable bread crumbs on glossary term”, you can disable / enable these links in this option

2: currently, we have no function to change the link in bread crumbs, but our developer said he is start to add a new option to allow admin to select another page as this link in breadcrumbs, once we finished this new function, we will reply you again 🙂

Thanks, have a blessed day with your family 🙂

Best Regards,
Wordpress Tooltip Plugin Support


That’s why we need develop a new version of wordpress tooltip plugin to implement the feature request from the amazing wordpress tooltip user, Our wordpress tooltips plugin developer have released a new wordpress tooltips pro plus version 31.0.8 to resolve it for the user 🙂


How to Replace the Glossary Category Link in the Glossary Breadcrumbs in the WordPress Tooltips Plugin?

1:If you are a user of the WordPress Tooltip Pro Plus plugin, please click on the “download wordpress tooltip” link to get the latest version of the tooltips plus plugin. Make sure the version number is equal to or greater than 31.0.8. If you are a new user, you will need to purchase a license for the WordPress Tooltip Pro Plus plugin.

2: Log in to your WordPress site as an administrator.

3: Navigate to the “Plugins” menu in the dashboard.

4: Deactivate and delete the existing version of the WordPress Tooltip plugin from the plugins panel.

5: Next, upload the new version of the WordPress Tooltip plugin by selecting the “Add New” button and choosing the plugin’s zip file.

6: Once the file is uploaded, activate the plugin from the plugins panel to enable its features.

7: If you are new user of wordpress tooltip plugin, please check our  video of how to install wordpress tooltip at:  WordPress Tooltips Video Tutorial 3: How to upload and activate wordpress tooltips pro plugin

8: In the WordPress dashboard, go to the “Tooltips” menu. Then, click on the “Glossary Settings” sub-menu item. The WordPress Tooltip menu appears as follows:

tooltips menu in wordpress tooltips pro plus 27.5.8

tooltips menu in wordpress tooltips pro plus 27.5.8

9: Within the WordPress glossary settings panel, you will find the “Replace Tooltip Category Link in Glossary Bread Crumbs” option, it looks like this:

As you can see at the bottom of the WordPress Glossary Settings panel, we have added a new option called ‘Replace Tooltip Category Link in Glossary Breadcrumbs’ In this option, there is a dropdown box listing all WordPress pages. You can simply select a different page from this dropdown to replace the glossary category link in the breadcrumbs. 🙂

Please note:

1: If you do not want to replace the glossary category link in Glossary Bread Crumbs, just select the item “None” in the dropdown box

2: If you selected a wordpress page from the dropdown box, even if the glossary item does not belong a  glossary category, we will still display the selected wordpress page as the glossary category, if you do not want to replace the glossary category link in the glossary breadcrumbs, please simply select the item “None” from the dropdown box

Also, we are adding new option to allow wordpress tooltip editor to replace other links in the Glossary Bread Crumbs

Thanks for the great feature request, if you have any more feature request, please don’t hesitate to contact us, we are very happy to implement it for you 🙂

Thanks, have a blessed day with your family 🙂

Best Regards,

WordPress tooltip plugin support

Tagged with: , , ,

What is WordPress Glossary?

Unlock the power of knowledge with our WordPress Tooltips Pro Plus plugin! Easily build stunning glossaries, lists, and directories that enhance user understanding and engagement.

A glossary is more than just a list of terms; it’s a valuable educational tool that dates back to ancient lexicons. By integrating glossaries into your WordPress site, you offer your visitors immediate access to complex terminology, making their experience smoother and more enjoyable.

You can create a versatile knowledge base, including glossaries, WooCommerce product lists, member directories, and much more. Customize your formats to match your brand’s style, and seamlessly integrate third-party data sources—turning your site into a powerful knowledge hub!

Tagged with: , ,

Support for ‘Display glossary term exactly as entered in the title column of the glossary’ in WordPress Tooltips Free Plugin 9.8.9

Hello, valued users of the WordPress Tooltip plugin! I trust you are having a wonderful weekend with your loved ones. We recently received an inquiry from a user regarding the WordPress Tooltip plugin, specifically asking how to resolve the “upper and lower case” concern on the glossary page. The user stated:”

hello,
as I reported on wordpress.org I noticed that if I enter a tooltip
with a capital letter, for example: “Open source” he replaces all
the words in my paragraph from open source to Open source.

Is it possible to make it keep the upper and lower case of the
paragraph and not be replaced by the tooltip title?

Thanks!

Our wordpress tooltip support team replied:


Hi,

Hope you are doing well and having happy days with your family

Thanks for the message

We are very happy to help you

Because we have many plugin versions with different functions, Would you please tell us:
1 the plugin version you are using
2 the URL related with the problem
3 a little more details to tell us how to find the problem in the URL

I will assign our developer to check it and solve it for you?

Thank you so much for the bug report, we’d like give you a gift as a THANKS, would you please make a $0 fake order at our demo:
https://tooltips.org/product/show-tooltips-in-woocommerce-products/
And then we can add one of our pro plugin license in your account as a THANKS?

Thanks, have a blessed day with your family

Best Regards,
Wordpress Tooltips Plugin Support Team

The amazing user replied:

Hello,

1. i am using version 9.6.9
2. my URL is: (removed)
3. As you can see all tooltips are with a capital initial letter but
within the article I wrote them with a lower case letter. For example
browser became Browser or even fork became Fork. I think it’s because
the tooltips were recorded with a capital letter but I think it’s not
correct that in the text they display capital letters without much
meaning.

What I expect is for the text to stay true to what I wrote in the
article.

Thank you.

Our wordpress tooltip support team replied:

Hi,

Thanks for the reply

I am assign our developer to check it and we will reply you again

Thanks, have a happy day with your loved ones

Best Regards,
Wordpress Tooltip Support

Then, our WordPress Tooltips plugin developer examined the user’s page, and we understood what the problem was. A few years ago, another amazing user of the WordPress glossary requested that glossary terms be displayed in uppercase to create a more dignified appearance. Now, we have developed a new version of the WordPress Tooltips plugin, version 9.8.9, to address this issue for WordPress Tooltip users. They can choose their preferred style for glossary terms.

How to Set Up Glossary Term Capitalization in the WordPress Tooltips Plugin?

1. Update to the most recent version of the WordPress Tooltips available through the WordPress Tooltips Free Plugin on WordPress, or easily obtain it at no cost from our official WordPress Tooltips download link.”

2. Within the WordPress admin panel, select the ‘Tooltips’ option from the menu. Then, from the list that appears, click on ‘Glossary Settings.’. This action will display the ‘Glossary Settings’ section, as depicted in the screenshot provided below:”

3. As you can see, at the bottom of the glossary settings panel, there is a new option: “Glossary Term Capitalization”. In the “Glossary Term Capitalization”, there are 2 options:

a: Display glossary term exactly as entered in the title column of the glossary

b: Uppercase letters display for glossary term in the title column of the glossary


with wordpress tooltips pro plus version, we added two more options:

c: Lowercase letters display for glossary term in the title column of the glossary

d: Initial Capitalization of glossary terms in the glossary title column

It looks like this:

In the case of what the user is requesting, you can simply select the option: “Display glossary term exactly as entered in the title column of the glossary” from the “Glossary Term Capitalization” dropdown box, then in the glossary page, you will find we have fulfilled your requirement:  “What I expect is for the text to stay true to what I wrote in the article”

You can select options based on your needs

We got a question from a new user of wordpress tooltip user, he asked us what is glossary, okay, a glossary looks like this:

The ideals which have lighted my way, and time after time have given me new courage to face life cheerfully, have been Kindness, Beauty, and Truth. The trite subjects of human efforts, possessions, outward success, luxury have always seemed to me contemptible.
Do something wonderful, people may imitate it.
To follow, without halt, one aim: There is the secret of success.
This is wordpress audio tooltip demo, audio is loading, please wait a moment. Your browser does not support the audio element.
Robert Louis Stevenson
Since wordpress tooltips pro 5.9.2 (the current version is 17.1.4), we start to support bullet screen effect, what is bullet screen? In some countries, for example Korean, China... and so on, a few site start to allows show text messages fly across the screen like bullets, we call it bullet screen, a example site which Read More
Bullet Screen lets you add scrolling comments, quotes, or tips to any WordPress post, offering users a unique and engaging experience
Strawberry & Cream Torte $9 only! On sale! Limited Time Offer! SHOP NOW

The Historical Context of Glossaries

The history of glossaries can be traced back to ancient civilizations, where scholars documented specialized vocabulary to preserve knowledge and facilitate understanding. For example, in ancient Greece and Rome, lexicons served a similar purpose, providing definitions and usage notes for complex language. Some of the earliest known glossaries date back to the first century AD, when scholars began compiling lists of terms for various fields of study. As languages evolved, the need for glossaries continued. During the Middle Ages, the rise of universities produced scholarly works that often included glossaries to aid students in comprehending new ideas. The advent of the printing press in the 15th century made it easier to produce and disseminate glossaries, thus expanding their reach and influence. In the modern era, glossaries have found a permanent place in educational materials, academic papers, and digital content, further reflecting the necessity of clear communication in an increasingly specialized world.

Understanding Glossary and WordPress Glossary

A glossary is a list of terms in a specific domain of knowledge, accompanied by definitions. It serves as a reference tool to help users understand jargon, technical language, or specialized terminology that may not be immediately clear. Glossaries are commonly found in books, articles, websites, and various forms of media, providing clarity and enhancing comprehension for the audience. In many fields, having a glossary is essential, as it can help bridge the gap between experts and novices. For instance, in technical or academic writing, the inclusion of a glossary allows readers to grasp complex ideas without getting lost in unfamiliar vocabulary. Businesses, educators, and organizations often create glossaries tailored to their specific contexts to ensure effective communication. In the digital realm, a WordPress glossary is a similar concept adapted for websites built on the WordPress platform. It offers a dedicated section where visitors can find definitions of terms relevant to the content of the website. A WordPress glossary enhances user experience, making it easier for visitors to understand key concepts and terminologies used throughout the site.

Why Use a WordPress Glossary?

  1. Improved User Experience: A well-structured glossary provides quick access to definitions, making it easier for users to follow along with your content. This is especially beneficial for websites that use technical terms or industry-specific jargon. By having a glossary, you reduce the likelihood of visitors leaving the site due to confusion or frustration.
  2. Increased Engagement: When users can easily find explanations for terms they encounter, they are more likely to stay on your site longer. An engaging experience can lead to increased page views, longer session durations, and higher user satisfaction.
  3. SEO Benefits: Search engines appreciate content that is clear and valuable to users. By including a glossary, you can create additional content optimized for relevant keywords, potentially improving your site’s visibility in search engine rankings. Additionally, when users share your glossary on social media or link to it from their own websites, you gain backlinks that can further enhance your SEO efforts.
  4. Establishing Authority: A glossary showcases your expertise in your field. By providing clear definitions and information, you can position your website as a reliable resource for visitors seeking knowledge in your area of specialization. This can help build trust and credibility with your audience.

Implementing a WordPress Glossary

Creating a glossary on your WordPress site can be simple. Many plugins are available that facilitate the inclusion of a glossary feature with minimal effort. These plugins often allow you to input terms and definitions, generate additional pages for each entry, and even apply tooltips that display definitions when users hover over terms in your content. For those who prefer a more customized approach, you can create a dedicated page or section for your glossary, manually inputting terms and descriptions. Organizing the glossary alphabetically or categorically can enhance its usability, allowing users to quickly find the information they seek.

Conclusion

In conclusion, a glossary plays a vital role in enhancing understanding and communication, making it an essential tool for various forms of content, especially in specialized fields. A WordPress glossary not only aids users in navigating complex terminology but also contributes to improved SEO, increased engagement, and the establishment of your website’s authority. By integrating a glossary into your WordPress site, you provide valuable resources for your audience while simultaneously enhancing their overall experience.

If you have any more question, please don’t hesitate to contact us, we are very happy to implement your feature request to build a better and better wordpress glossary plugin

Thanks, have a blessed weekend with your family

Best Regards,

WordPress tooltips plugin support team


Tagged with: , , , ,

What is Glossary and What is a WordPress Glossary?

Understanding Glossary and WordPress Glossary

A glossary is a list of terms in a specific domain of knowledge, accompanied by definitions. It serves as a reference tool to help users understand jargon, technical language, or specialized terminology that may not be immediately clear. Glossaries are commonly found in books, articles, websites, and various forms of media, providing clarity and enhancing comprehension for the audience. In many fields, having a glossary is essential, as it can help bridge the gap between experts and novices. For instance, in technical or academic writing, the inclusion of a glossary allows readers to grasp complex ideas without getting lost in unfamiliar vocabulary. Businesses, educators, and organizations often create glossaries tailored to their specific contexts to ensure effective communication. In the digital realm, a WordPress glossary is a similar concept adapted for websites built on the WordPress platform. It offers a dedicated section where visitors can find definitions of terms relevant to the content of the website. A WordPress glossary enhances user experience, making it easier for visitors to understand key concepts and terminologies used throughout the site.

Why Use a WordPress Glossary?

  1. Improved User Experience: A well-structured glossary provides quick access to definitions, making it easier for users to follow along with your content. This is especially beneficial for websites that use technical terms or industry-specific jargon. By having a glossary, you reduce the likelihood of visitors leaving the site due to confusion or frustration.
  2. Increased Engagement: When users can easily find explanations for terms they encounter, they are more likely to stay on your site longer. An engaging experience can lead to increased page views, longer session durations, and higher user satisfaction.
  3. SEO Benefits: Search engines appreciate content that is clear and valuable to users. By including a glossary, you can create additional content optimized for relevant keywords, potentially improving your site’s visibility in search engine rankings. Additionally, when users share your glossary on social media or link to it from their own websites, you gain backlinks that can further enhance your SEO efforts.
  4. Establishing Authority: A glossary showcases your expertise in your field. By providing clear definitions and information, you can position your website as a reliable resource for visitors seeking knowledge in your area of specialization. This can help build trust and credibility with your audience.

Implementing a WordPress Glossary

Creating a glossary on your WordPress site can be simple. Simply install wordpress tooltips plugin, the plugin  allow you to input terms and definitions, generate additional pages for each entry, and even apply tooltips that display definitions when users hover over terms in your content. For those who prefer a more customized approach, you can create a dedicated page or section for your glossary, manually inputting terms and descriptions. Organizing the glossary alphabetically or categorically can enhance its usability, allowing users to quickly find the information they seek.

In wordpress tooltips plugin, what you need to do is simply insert the shortcode [ glossary ] in your wordpress post, and you will own a pretty glossary in 1 minutes, it looks like this:

The ideals which have lighted my way, and time after time have given me new courage to face life cheerfully, have been Kindness, Beauty, and Truth. The trite subjects of human efforts, possessions, outward success, luxury have always seemed to me contemptible.
Do something wonderful, people may imitate it.
To follow, without halt, one aim: There is the secret of success.
This is wordpress audio tooltip demo, audio is loading, please wait a moment. Your browser does not support the audio element.
Robert Louis Stevenson
Since wordpress tooltips pro 5.9.2 (the current version is 17.1.4), we start to support bullet screen effect, what is bullet screen? In some countries, for example Korean, China... and so on, a few site start to allows show text messages fly across the screen like bullets, we call it bullet screen, a example site which Read More
Bullet Screen lets you add scrolling comments, quotes, or tips to any WordPress post, offering users a unique and engaging experience
Strawberry & Cream Torte $9 only! On sale! Limited Time Offer! SHOP NOW

Conclusion

In conclusion, a glossary plays a vital role in enhancing understanding and communication, making it an essential tool for various forms of content, especially in specialized fields. A WordPress glossary not only aids users in navigating complex terminology but also contributes to improved SEO, increased engagement, and the establishment of your website’s authority. By integrating a glossary into your WordPress site, you provide valuable resources for your audience while simultaneously enhancing their overall experience.

If you have any more question, please don’t hesitate to contact us, we are very happy to implement your feature request to build a better and better wordpress glossary plugin 🙂

Thanks, have a blessed weekend with your family 🙂

Best Regards,

WordPress tooltips plugin support team

Tagged with: ,

Jak zobrazit názvy termínů s počátečním velkým písmenem ve sloupci názvů slovníku v pluginu WordPress Tooltip, podporovaný WordPress Tooltips Pro Plus 31.0.8

Ahoj, milí uživatelé WordPress Tooltip, upřímně doufám, že vás tato zpráva zastihne v nejlepších duševních stavech a že se těšíte z tepla a štěstí po boku vašich milovaných přátel. Před několika dny jsme obdrželi požadavek na podporu od nového uživatele pluginu WordPress Tooltip. V požadavku tento uživatel vyjadřuje své ocenění pro plugin WordPress Tooltip a zmiňuje malý problém, na který narazil. Vysvětluje, že při zadávání termínu do slovníku se tento termín automaticky převádí na velká písmena ve sloupci názvů slovníku na frontendu. Chtěli by mít možnost zvolit, zda se termín slovníku zobrazí ve velkých nebo malých písmenech ve sloupci názvů slovníku. Věří, že tato volba by uživatelům poskytla větší flexibilitu. Žádají, aby byla tato možnost zvážena v budoucí aktualizaci. Uživatel závěrem vyjadřuje vděčnost za plugin a doufá v odpověď a budoucí aktualizace.

Náš vývojář pluginu WordPress Tooltips vyvinul novou verzi WordPress Tooltips Pro Plus 30.9.8, aby splnil požadavek úžasného uživatele WordPress Tooltip co nejdříve (Jak zobrazit velká nebo malá písmena ve specifikovaném sloupci názvů slovníku v pluginu WordPress Tooltip, podporovaném WordPress Tooltips Pro Plus 30.9.8).

Uživatel tooltipu nainstaloval naši novou verzi na svůj WordPress web a poté odpověděl:

Moc vám děkuji za veškerou vaši tvrdou práci! Opravdu si toho vážím. Udělali jste úžasnou práci a splnili mou žádost přesně tak, jak jsem chtěl. Musím říct, že nová verze pluginu WordPress Tooltip je neuvěřitelná! Nicméně jsem si uvědomil, že vlastně potřebuji funkci počátečního velkého písmena, aby to vypadalo ještě lépe. Můžeme možná odstranit tu možnost a nechat termín slovníku vždy zobrazovat s počátečním velkým písmenem? Ještě jednou děkuji za všechno, co jste udělali. Vaše oddanost je opravdu pozoruhodná!

Náš vývojář pluginu WordPress Tooltips zvážil tento nový požadavek a rozhodli jsme se přidat novou možnost “Počáteční velká písmena termínů ve slovníku ve sloupci názvů slovníku” aby splnila potřeby našeho uživatele WordPress slovníku.

Jak zobrazit názvy termínů s počátečním velkým písmenem ve sloupci názvů slovníku v pluginu WordPress Tooltip?

1: Pokud jste zákazníkem pluginu WordPress Tooltip Pro Plus, klikněte na odkaz „download wordpress tooltip“ a stáhněte si nejnovější verzi pluginu. Ujistěte se, že číslo verze je rovné nebo vyšší než 31.0.8. Pokud jste nový uživatel, budete muset zakoupit licenci pro plugin WordPress Tooltip Pro Plus.
2: Přihlaste se na svůj WordPress web jako administrátor.
3: Přejděte do nabídky „Pluginy“ na ovládacím panelu.
4: Deaktivujte a smažte stávající verzi pluginu WordPress Tooltip z panelu pluginů.
5: Následně nahrajte novou verzi pluginu WordPress Tooltip výběrem tlačítka „Přidat nový“ a výběrem souboru zip pluginu.
6: Jakmile je soubor nahrán, aktivujte plugin z panelu pluginů, aby byly jeho funkce povoleny.
7: Pokud jste novým uživatelem pluginu WordPress Tooltip, podívejte se na naše video o tom, jak nahrát a aktivovat WordPress Tooltips na: WordPress Tooltips Video Tutorial 3: How to upload and activate wordpress tooltips pro plugin.
8: V ovládacím panelu WordPress přejděte do nabídky „Tooltips“. Poté klikněte na položku „Nastavení slovníku“. Nabídka WordPress Tooltip se zobrazuje následovně:
tooltips menu in wordpress tooltips pro plus 27.5.8
menu tooltips ve wordpress tooltips pro plus 27.5.8
9: V rámci panelu nastavení slovníku WordPress najdete možnost „Capitalizace termínů slovníku“. To vám umožní zvolit, jak se termíny slovníku zobrazují ve sloupci názvů slovníku. Máte tři možnosti:

„Zobrazení termínů slovníku velkými písmeny ve sloupci názvů slovníku“
„Zobrazení termínů slovníku malými písmeny ve sloupci názvů slovníku“
„Počáteční velké písmeno termínů slovníku ve sloupci názvů slovníku“
Výběrem jedné z těchto možností můžete ovládat, zda se termíny slovníku zobrazí velkými, malými nebo s počátečním velkým písmenem ve specifikovaném sloupci názvů slovníku pluginu WordPress Tooltip.

Doufám, že to trochu pomůže
Pokud máte další nápady, neváhejte nás kontaktovat. Uděláme vše pro to, abychom co nejdříve splnili vaše požadavky!
Děkujeme, mějte požehnaný den se svými blízkými
S pozdravem,
Tým podpory pluginu WordPress Tooltips

Tagged with: , , , , , ,

Hur man visar termtitlar med initiala versaler i kolumnen för ordlistetitlar i WordPress Tooltip Plugin, stöds av WordPress Tooltips Pro Plus 31.0.

Hej, kära WordPress Tooltip-användare, jag hoppas innerligt att detta meddelande når dig i bästa skick och att du njuter av lyckans värme tillsammans med dina kära. För några dagar sedan fick vi en supportbiljett från en ny användare av WordPress Tooltip-pluginet. I biljetten uttrycker användaren sin uppskattning för WordPress Tooltip-pluginet och nämner ett mindre problem de stött på. De förklarar att när de matar in ett ordlisteterm, omvandlas det automatiskt till versaler i kolumnen för ordlistetitlar på frontend. De skulle dock vilja ha möjligheten att välja om ordlistetermen ska visas med versaler eller gemener i kolumnen för ordlistetitlar. De tror att denna valmöjlighet skulle ge användarna mer flexibilitet. De ber att detta alternativ övervägs i en framtida uppdatering. Användaren avslutar med att uttrycka tacksamhet för pluginet och hoppas på ett svar och framtida uppdateringar.
Vår WordPress Tooltip-pluginutvecklare har utvecklat en ny version, WordPress Tooltips Pro Plus 30.9.8, för att möta den fantastiska WordPress Tooltip-användarens krav så snart som möjligt (Hur man visar versaler eller gemener i den angivna kolumnen för ordlistetitlar i WordPress Tooltip-pluginet, stöds av WordPress Tooltips Pro Plus 30.9.8)

Tooltip-användaren installerade vår nya version på sin WordPress-sida, sedan svarade han:

Tack så mycket för allt ditt hårda arbete! Jag uppskattar det verkligen. Du har gjort ett fantastiskt jobb med att uppfylla min begäran precis som jag ville. Jag måste säga att den nya versionen av WordPress Tooltip-pluginet är otrolig! Men jag har insett att jag faktiskt behöver funktionen för initiala versaler för att få det att se ännu bättre ut. Kan vi möjligen ta bort alternativet och alltid visa ordlistetermen med initiala versaler? Än en gång, tack för allt du har gjort. Din hängivenhet är verkligen anmärkningsvärd!
Vår WordPress-ordlistapluginnutvecklare övervägde detta nya krav, och vi bestämde oss för att lägga till ett nytt alternativ, ‘Initiala versaler för ordlistetermer i kolumnen för ordlistetitlar,’ för att möta behoven hos vår WordPress-ordlistanvändare

Hur man visar termtitlar med initiala versaler i kolumnen för ordlistetitlar i WordPress Tooltip Plugin?

1: Om du är kund av WordPress Tooltip Pro Plus-pluginet, klicka på länken “download wordpress tooltip” för att få den senaste versionen av pluginet. Se till att versionsnumret är lika med eller större än 31.0.8. Om du är en ny användare behöver du köpa en licens för WordPress Tooltip Pro Plus-pluginet.
2: Logga in på din WordPress-sida som administratör.
3: Navigera till menyn “Plugins” i kontrollpanelen.
4: Inaktivera och ta bort den befintliga versionen av WordPress Tooltip-pluginet från pluginpanelen.
5: Ladda upp den nya versionen av WordPress Tooltip-pluginet genom att välja knappen “Add New” och välja pluginets zip-fil.
6: När filen har laddats upp, aktivera pluginet från pluginpanelen för att möjliggöra dess funktioner.
7: Om du är ny användare av WordPress Tooltip-pluginet, vänligen kolla vår video om hur man installerar WordPress Tooltip på: WordPress Tooltips Video Tutorial 3: How to upload and activate wordpress tooltips pro plugin
8: I WordPress-kontrollpanelen, gå till menyn “Tooltips”. Klicka sedan på undermenyalternativet “Glossary Settings”. WordPress Tooltip-menyn ser ut som följer:

tooltips menu in wordpress tooltips pro plus 27.5.8
tooltips-menyn i wordpress tooltips pro plus 27.5.8
9: Inom WordPress ordlistainställningspanelen hittar du alternativet “Glossary Term Capitalization”. Detta låter dig välja hur ordlistetermerna visas i kolumnen för ordlistetitlar. Du har tre alternativ:
plaintext
“Versaler visas för ordlistetermer i kolumnen för ordlistetitlar”
“Gemener visas för ordlistetermer i kolumnen för ordlistetitlar”
“Initiala versaler för ordlistetermer i kolumnen för ordlistetitlar”
Genom att välja ett av dessa alternativ kan du kontrollera om ordlistetermerna visas med versaler, gemener eller med initiala versaler i den angivna kolumnen för ordlistetitlar i WordPress Tooltip-pluginet.

Hoppas detta kan vara till lite hjälp
Om du har fler idéer, tveka inte att kontakta oss. Vi kommer att göra vårt bästa för att uppfylla dina önskemål så snart som möjligt!
Tack, ha en välsignad dag med dina nära och kära
Vänliga hälsningar,
WordPress tooltips plugin support team


Tagged with: , , , , , ,

Как отобразить названия терминов с начальной заглавной буквой в столбце названия глоссария в плагине WordPress Tooltip, поддерживаемом WordPress Tooltips Pro Plus 31.0.8

Привет, уважаемые пользователи WordPress Tooltip , я искренне надеюсь, что это сообщение найдет вас в хорошем настроении и в окружении любимых людей. Несколько дней назад мы получили заявку на поддержку от нового пользователя плагина WordPress Tooltip, в которой он выразил благодарность за плагин WordPress Tooltip и упомянул о незначительной проблеме. Он объяснил, что при вводе термина в глоссарий он автоматически преобразуется в заглавные буквы в столбце названия глоссария на фронтенде. Однако он хотел бы иметь возможность выбирать, отображать ли термин глоссария в заглавных или строчных буквах в столбце названия глоссария. Он считает, что наличие такого выбора предоставило бы пользователям больше гибкости. Пользователь попросил рассмотреть возможность добавления этой опции в будущих обновлениях. Он завершил свое сообщение выражением благодарности за плагин и надеждой на ответ и будущие обновления.

Наш разработчик плагина WordPress Tooltip разработал новую версию WordPress Tooltips Pro Plus 30.9.8, чтобы как можно скорее удовлетворить потребности замечательного пользователя плагина WordPress Tooltip (Как отображать заглавные или строчные буквы в указанном столбце названия глоссария в плагине WordPress Tooltip, поддерживаемом WordPress Tooltips Pro Plus 30.9.8)

Пользователь установил нашу новую версию на свой сайт WordPress, а затем ответил:
Большое спасибо за всю вашу работу! Я действительно ценю это. Вы проделали удивительную работу, точно выполнив мой запрос. Должен сказать, что новая версия плагина WordPress Tooltip просто невероятна! Однако я осознал, что на самом деле мне нужна функция начальной капитализации, чтобы сделать его еще лучше. Можно ли удалить эту опцию и всегда отображать термин глоссария с начальной заглавной буквы? Еще раз спасибо за все, что вы сделали. Ваше посвящение действительно замечательно!

Наш разработчик плагина WordPress глоссария учел это новое требование, и мы решили добавить новую опцию «Начальная капитализация терминов глоссария в столбце названия глоссария», чтобы удовлетворить потребности нашего пользователя WordPress глоссария

Как отобразить заголовки терминов с начальной заглавной буквой в колонке заголовков глоссария плагина WordPress Tooltip?

1. Если вы являетесь клиентом плагина WordPress Tooltip Pro Plus, пожалуйста, нажмите на ссылку «скачать WordPress Tooltip», чтобы получить последнюю версию плагина. Убедитесь, что номер версии равен или превышает 31.0.8. Если вы новый пользователь, вам необходимо приобрести лицензию на плагин WordPress Tooltip Pro Plus.
2. Войдите на свой сайт WordPress в качестве администратора.
3. Перейдите в меню «Плагины» на панели управления.
4. Деактивируйте и удалите существующую версию плагина WordPress Tooltip из панели плагинов.
5. Затем загрузите новую версию плагина WordPress Tooltip, выбрав кнопку «Добавить новый» и выбрав zip-файл плагина.
6. После загрузки файла активируйте плагин из панели плагинов, чтобы включить его функции.
7. Если вы новый пользователь плагина WordPress Tooltip, пожалуйста, посмотрите наше видео о том, как установить WordPress Tooltip по ссылке: Видео-урок WordPress Tooltips 3: Как загрузить и активировать плагин WordPress Tooltips Pro.
8. В панели управления WordPress перейдите в меню «Tooltips». Затем нажмите на пункт подменю «Glossary Settings». Меню WordPress Tooltip выглядит следующим образом:

tooltips menu in wordpress tooltips pro plus 27.5.8

– меню tooltips в WordPress Tooltips Pro Plus 27.5.8
9. В панели настроек глоссария WordPress вы найдете опцию «Glossary Term Capitalization». Это позволяет выбрать, как термины глоссария будут отображаться в колонке заголовков глоссария. У вас есть три варианта:
– «Заглавные буквы для терминов глоссария в колонке заголовков глоссария»
– «Строчные буквы для терминов глоссария в колонке заголовков глоссария»
– «Начальная заглавная буква для терминов глоссария в колонке заголовков глоссария»
Выбрав одну из этих опций, вы можете контролировать, будут ли термины глоссария отображаться заглавными буквами, строчными буквами или с начальной заглавной буквой в указанной колонке заголовков глоссария плагина WordPress Tooltip.

Надеемся, это немного поможет
Если у вас есть еще идеи, пожалуйста, не стесняйтесь обращаться к нам. Мы сделаем все возможное, чтобы выполнить ваши требования как можно скорее!
Спасибо, желаем вам благословенного дня в кругу ваших близких
С наилучшими пожеланиями,
Команда поддержки плагина WordPress Tooltips

Tagged with: , , , , , ,

Hoe termtitels met initiale hoofdletters weergeven in de kolom “Glossary Title” van de WordPress Tooltip-plugin, ondersteund door WordPress Tooltips Pro Plus 31.0.8.

Hallo, beste gebruikers van WordPress Tooltip, Ik hoop oprecht dat dit bericht jullie in de beste stemming bereikt en dat jullie genieten van geluk en warmte samen met jullie dierbaren. Een paar dagen geleden ontvingen we een supportticket van een nieuwe gebruiker van de WordPress Tooltip-plugin. In het ticket uit de gebruiker van WordPress Tooltip zijn waardering voor de WordPress Tooltip-plugin en meldt een klein probleem dat ze tegenkwamen. Ze leggen uit dat bij het invoeren van een woordenlijstterm deze automatisch wordt omgezet naar hoofdletters in de kolom “Glossary Title” aan de voorkant. Ze zouden echter graag de optie hebben om te kiezen of de woordenlijstterm in hoofdletters of kleine letters moet worden weergegeven in de kolom “Glossary Title”. Ze geloven dat deze keuzemogelijkheid gebruikers meer flexibiliteit zou bieden. Ze vragen om deze optie te overwegen in een toekomstige update. De gebruiker sluit af door dankbaarheid uit te drukken voor de plugin en hoopt op een reactie en toekomstige updates. 🙂

Onze ontwikkelaar van de WordPress Tooltip-plug-in heeft een nieuwe versie ontwikkeld, WordPress Tooltips Pro Plus 30.9.8, om zo snel mogelijk aan de eis van deze geweldige WordPress Tooltip-gebruiker te voldoen (Hoe hoofdletters of kleine letters weer te geven in de gespecificeerde kolom “Glossary Title” in de WordPress Tooltip-plugin, ondersteund door WordPress Tooltips Pro Plus 30.9.8)

De tooltip-gebruiker heeft onze nieuwe versie geïnstalleerd op zijn WordPress-site en vervolgens antwoordde hij:

Heel erg bedankt voor al jullie harde werk! Ik waardeer het echt. Jullie hebben geweldig werk geleverd door mijn verzoek precies zoals ik wilde uit te voeren. Ik moet zeggen, de nieuwe versie van de WordPress Tooltip-plugin is ongelooflijk! Maar ik ben tot de conclusie gekomen dat ik eigenlijk de functie voor initiale hoofdletters nodig heb om het er nog beter uit te laten zien. Kunnen we mogelijk de optie verwijderen en ervoor zorgen dat de glossary-term altijd met initiale hoofdletters wordt weergegeven? Nogmaals, bedankt voor alles wat jullie hebben gedaan. Jullie toewijding is echt opmerkelijk!
Onze ontwikkelaar van de WordPress-glossary-plug-in heeft deze nieuwe vereiste overwogen en we hebben besloten een nieuwe optie toe te voegen, ‘Initiële hoofdletters van glossary-termen in de kolom “Glossary Title”,’ om te voldoen aan de behoeften van onze WordPress-glossary-gebruiker. 🙂


Hoe titels van termen met initiale hoofdletters weer te geven in de kolom “Glossary Title” van de WordPress Tooltip-plugin?

  1. Als je klant bent van de WordPress Tooltip Pro Plus-plugin, klik dan op de link “download wordpress tooltip” om de nieuwste versie van de plugin te downloaden. Zorg ervoor dat het versienummer gelijk is aan of hoger is dan 31.0.8. Als je een nieuwe gebruiker bent, moet je een licentie aanschaffen voor de WordPress Tooltip Pro Plus-plugin.
  2. Log in op je WordPress-site als beheerder.
  3. Navigeer naar het menu “Plugins” in het dashboard.
  4. Deactiveer en verwijder de bestaande versie van de WordPress Tooltip-plugin uit het plugins-paneel.
  5. Upload de nieuwe versie van de WordPress Tooltip-plugin door de knop “Nieuwe toevoegen” te selecteren en het zip-bestand van de plugin te kiezen.
  6. Activeer de plugin vanuit het plugins-paneel zodra het bestand is geüpload om de functies in te schakelen.
  7. Als je een nieuwe gebruiker van de WordPress Tooltip-plugin bent, bekijk dan onze video over het installeren van de WordPress Tooltip op: WordPress Tooltips Video Tutorial 3: Hoe de WordPress Tooltips Pro-plugin te uploaden en activeren.
  8. Ga in het WordPress-dashboard naar het menu “Tooltips”. Klik vervolgens op het submenu-item “Glossary Settings”. Het WordPress Tooltip-menu ziet er als volgt uit:
    • tooltips menu in wordpress tooltips pro plus 27.5.8
    • tooltips menu in wordpress tooltips pro plus 27.5.8
  9. Binnen het instellingenpaneel van de WordPress-glossary vind je de optie “Glossary Term Capitalization”. Hiermee kun je kiezen hoe de glossary-termen worden weergegeven in de titelkolom van de glossary. Je hebt drie opties:
    • “Weergave van hoofdletters voor glossary-termen in de titelkolom van de glossary”
    • “Weergave van kleine letters voor glossary-termen in de titelkolom van de glossary”
    • “Initiële hoofdletters van glossary-termen in de kolom ‘Glossary Title'” Door een van deze opties te selecteren, kun je bepalen of de glossary-termen in hoofdletters, kleine letters of met een hoofdletter aan het begin worden weergegeven in de gespecificeerde titelkolom van de WordPress Tooltip-plugin.

Espero que isso tenha sido de alguma ajuda 🙂
Se você tiver mais ideias, não hesite em entrar em contato conosco. Faremos o nosso melhor para atender às suas necessidades o mais rápido possível! 🙂
Obrigado, tenha um dia abençoado junto de seus entes queridos 🙂
Atenciosamente,
Equipe de suporte do plugin WordPress tooltips

Tagged with: , , , , , ,
Top